

The sunlight dapples through the leaves, casting delicate patterns on a smooth table where coffee filters lie waiting. These thin, textured circles invite gentle hands to explore their potential. You can feel the soft fibers, almost whispering the promise of transformation. By introducing colors to these filters, we enter a world of mesmerizing chromatography, creating coffee filter butterflies that flutter with vivid hues. This calming craft allows you to slow down, focusing on each color that blooms like a flower. The whole process is a soothing experience, merging science and art with a touch of creativity, drawing you into a mindful state. You may also find Crispy Diy Coffee Filter Tie Dye Flowers useful.
Why Make This Chromatography with Coffee Filter Butterflies
Engaging with the process of making chromatography butterflies can deeply enhance your connection to the moment. As you mix colors and watch them separate, there is a quiet joy in witnessing nature’s beauty firsthand. This activity encourages you to slow down, appreciate the colors, and embrace your innate creativity. The rhythmic movement of dipping filters into dye, followed by the surprise of the resulting patterns, cultivates a serene atmosphere that feels perfect for nurturing calm. It is not just a craft; it’s a gentle reminder of the simple pleasures found in creation. You might find inspiration for these butterflies in other DIY projects, like this coffee filter cozy calm that blends relaxation with creativity.
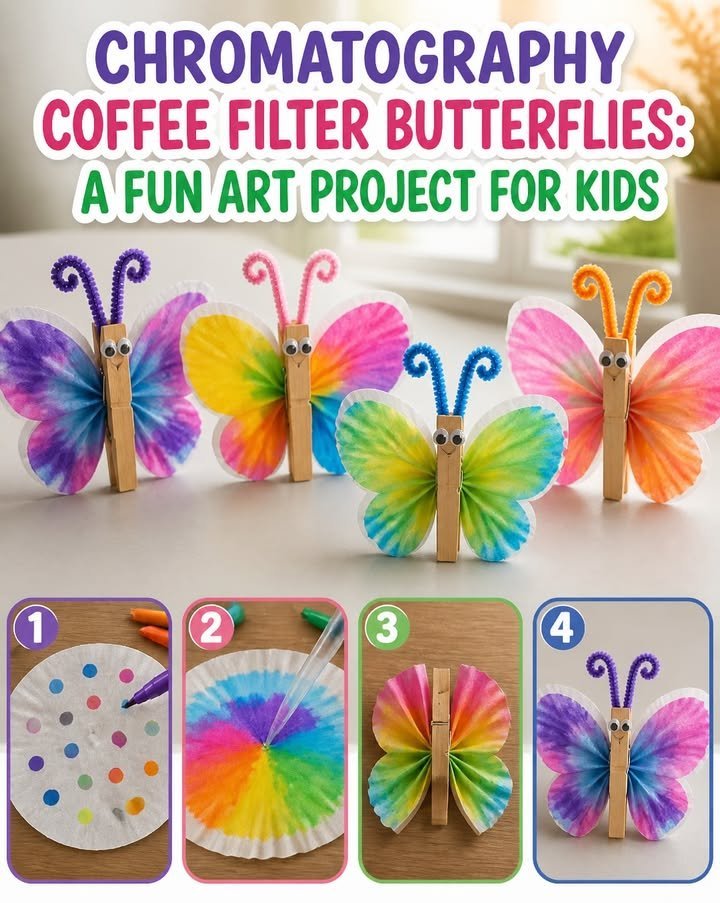
A Gentle Look at the Process
Picture the flow that comes with creating these butterflies. The process begins with selecting colors, and as you choose them, imagine how they will mix and mingle. Feel the anticipation about which hues will surprise you once combined. This method of chromatography is all about patience and wonder, allowing each moment to unfold naturally. You may also find Diy Coffee Filter Tie Dye Calming Blooms useful.
The gentle sound of water as you prepare your dyes sets a calming rhythm. The swirls you create in the cups evoke feelings of whimsy and delight. Spreading the colors across the coffee filters will seem like a dance, each stroke revealing a part of yourself and the colors weaving into one another in unexpected ways. Take your time, enjoy the textures, and let the experience envelop you.
Materials You’ll Need
- Coffee filters (standard size works well)
- Washable markers or food coloring
- Small containers for dye (like plastic cups)
- Water
- Spray bottle or droppers
- Scissors
- String or pipe cleaners for assembly (optional)
Gathering these materials can be a part of the calming process, allowing you to feel prepared and intentional about your craft. Many of these items are easy to find around the home. For those interested in exploring more designs, consider this creative option with tie-dye flowers documented in a cozy project.
Step-by-Step Directions
-
Prepare Your Dye: Pour water into the containers and mix in your washable markers or food coloring. Experiment with different colors to create a lovely spectrum.
-
Moisten the Coffee Filters: Use a spray bottle filled with water to lightly dampen the coffee filters, making sure they are not soaking wet, as this can lead to muddled colors.
-
Apply Color: Use the markers to draw different shapes or designs on each coffee filter. Embrace your creativity!
-
Dip and Observe: Submerge the edges of the colored filter into the dye solutions. Watch the colors spread and blend, creating beautiful patterns.
-
Drying: After pulling them out, lay the filters flat on a clean surface, allowing them to dry completely.
-
Cutting and Assembly: Once dry, you can cut them into butterfly shapes and decorate with string or pipe cleaners to create the body of the butterfly.
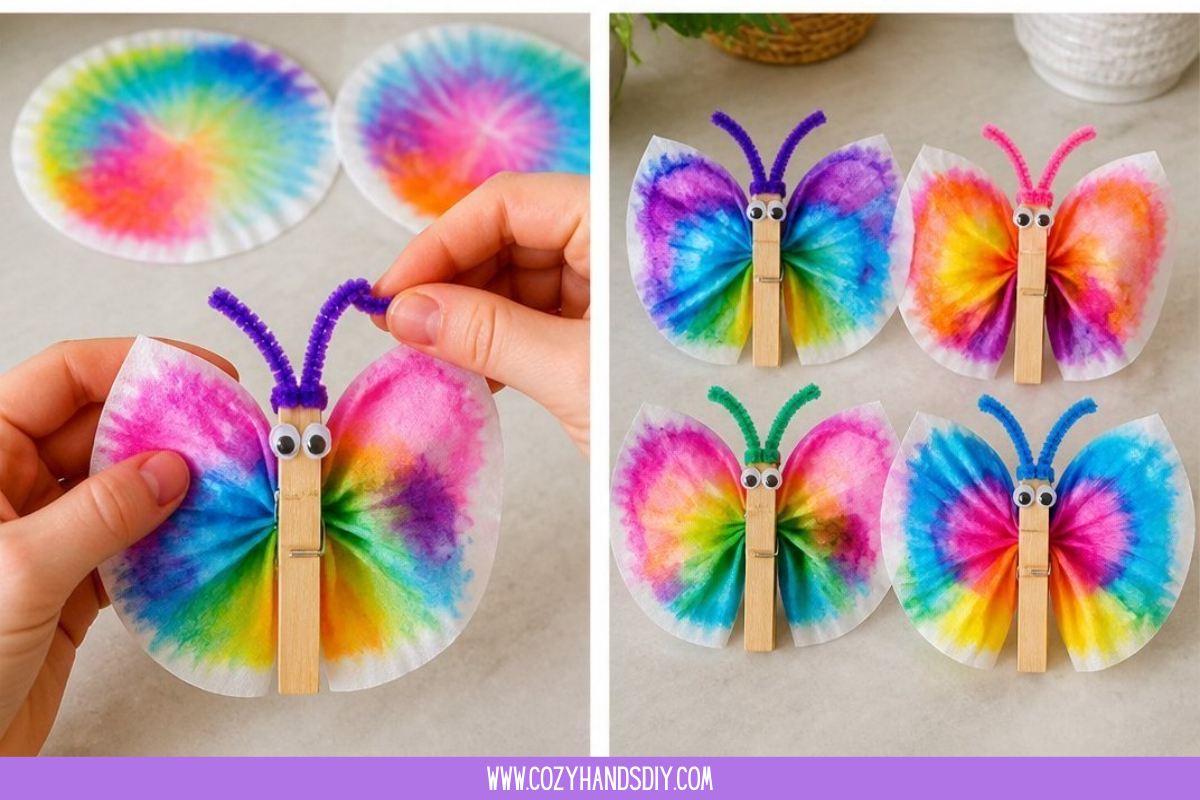
Enjoying the Finished Piece
Once your coffee filter butterflies are complete, consider how to display them. These creations can brighten any space, whether hung in a window where light filters through them, or strung garland-style across a wall. This simple yet beautiful craft can infuse a sense of calm into your daily routine. You can place them in small vases or use them as part of a centerpiece, creating a gentle reminder of the colors and creativity that brought them to life.
Keeping It for Later
Storing your finished butterflies requires a gentle touch. If you’ve made several, place them in a folder or a keepsake box, ensuring they are flat to avoid any crumpling or damage. They can even be reused for different seasons or occasions, such as hanging them during springtime or using them in holiday decorations. The beauty of these creations lies in their versatility.
Gentle Tips & Variations
-
Different Techniques: Try using a variety of colors and patterns with different art supplies, like paints or even sponges, for a unique twist on your butterflies.
-
Experiment with Shapes: Rather than just traditional butterfly wings, consider creating flowers or abstract shapes using the same technique.
-
Mindful Moments: Take time to reflect on the colors you choose. Each hue can represent different feelings or memories.
-
Incorporate Sounds: Pair your craft with soft music or nature sounds to enhance the sensory experience.
-
Family Involvement: Invite family or friends to join this creative journey, sharing colors, ideas, and moments while enjoying the peaceful atmosphere created.
FAQs About Chromatography with Coffee Filter Butterflies
What is chromatography?
Chromatography is a method used to separate mixtures, such as colors, often applying to art and science projects. It highlights how substances can mix and separate based on their characteristics.
Can I use different types of colors?
Yes! Using food coloring or washable markers works beautifully. Both options yield vibrant results that blend brilliantly on the coffee filters.
Are these butterflies safe for children?
This craft is generally safe for kids under adult supervision. Using washable markers makes it easy to clean up if any colors stray.
Conclusion
Creating chromatography with coffee filter butterflies is a gentle way to explore colors and mindfulness, weaving together creativity and relaxation. By connecting with nature through this artistic process, you enable a serene environment for yourself or your loved ones. Remember that each butterfly tells a story of color and creativity, uniquely yours. For further inspiration, check out the fun activities offered in the Butterfly Chromatography Craft – Carnegie Museum of Natural History or dive into the exciting world of color separation with Science for Kids: Chromatography Butterfly Craft – Buggy and Buddy. Enjoy the journey and let each moment be a part of your creative path.
PrintChromatography Coffee Filter Butterflies
Create mesmerizing coffee filter butterflies using chromatography techniques. This craft combines art and science for a calming experience.
- Prep Time: 10 minutes
- Cook Time: 0 minutes
- Total Time: 10 minutes
- Yield: 12 butterflies
- Category: Craft
- Method: Crafting
- Cuisine: N/A
- Diet: N/A
Ingredients
- Coffee filters (standard size)
- Washable markers or food coloring
- Small containers for dye (like plastic cups)
- Water
- Spray bottle or droppers
- Scissors
- String or pipe cleaners for assembly (optional)
Instructions
- Prepare Your Dye: Pour water into the containers and mix in your washable markers or food coloring.
- Moisten the Coffee Filters: Lightly dampen the coffee filters with water using a spray bottle.
- Apply Color: Use the markers to draw different shapes on each coffee filter.
- Dip and Observe: Submerge the edges of the colored filters into the dye solutions.
- Drying: Lay the filters flat on a clean surface to dry completely.
- Cutting and Assembly: Cut the dried filters into butterfly shapes and decorate with string or pipe cleaners.
Notes
These butterflies can be used for decoration or as part of seasonal displays. Store them flat to avoid damage.