

From shell to crystal treasure! Just wait for the sparkle! Would you try this? Imagine sitting by the sea, feeling the warm sun on your skin while gentle waves lap against the shore. The shells scattered on the sand glimmer in the light, each one holding a story of the depths they once called home. This DIY project invites you to capture that essence, transforming ordinary seashells into vibrant, sparkling treasures. It’s a creative venture that encourages you to slow down, engaging your senses in the soothing rhythm of crafting. You may also find How To Make Diy Crystal Seashells Easy useful.
Why Make This From shell to crystal treasure! Just wait for the sparkle! Would you try this? Feels Comforting to Create
Creating your own sparkling seashells is more than just a craft; it is a nurturing experience that calms the mind and fills the heart with joy. The tactile engagement of handling shells and crystals invites tranquility into your space. As you dive into this project, you can take a moment to breathe and shift your focus away from the busyness of daily life. The process of transforming these natural objects into something extraordinary fosters a sense of achievement and mindfulness that is deeply fulfilling. You may also find How To Make Diy Crystal Seashells useful.

A Gentle Look at the Process
Before you begin making your crystal seashells, it is helpful to understand the overall flow of the project. This creative journey involves a series of gentle steps, where each movement is infused with intention and care. You gently prepare your materials, observing the textures and colors involved. The soft sound of stirring your ingredients will soothe you as you work, transporting you into a calm, focused state. The satisfaction of seeing your seashells becoming coated in sparkly crystals is a delightful reward that will surely brighten your day. You may also find Baking Soda Rainbow Crystal Forest Rainbow Crystals useful.
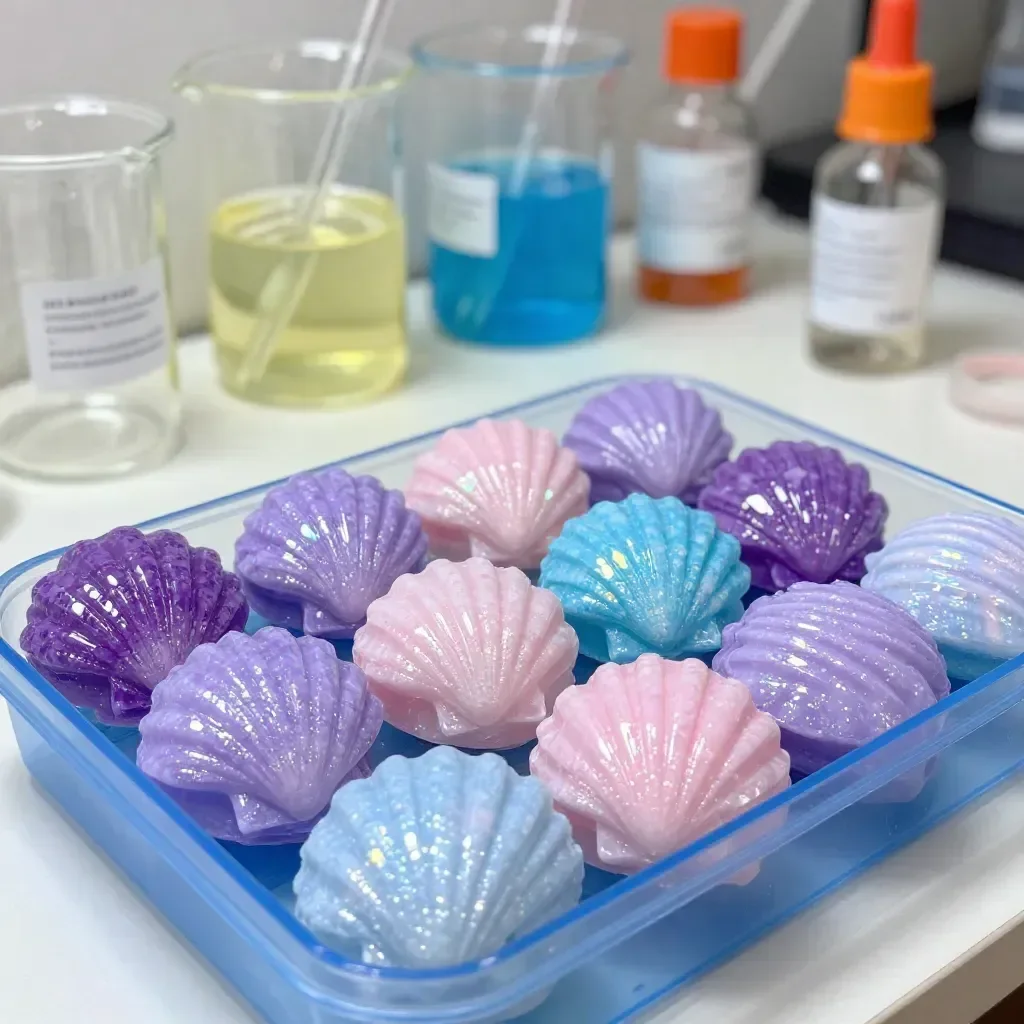
Materials You’ll Need
To begin your journey in creating these beautiful crystal seashells, gather the following materials:
- Seashells (easy to find at the beach or craft store)
- Baking soda (for the crystal structure)
- Water (room temperature)
- Food coloring (optional for vibrant color)
- Bowls for mixing
- A spoon for stirring
- Baking sheet (for drying)
- Wax paper or a silicone mat (for easy cleanup)
Each item plays a role in bringing your shell-crystal creations to life, with most being simple and straightforward to gather.
Step-by-Step Directions
Prepare Your Shells: Rinse your seashells gently under cool water to remove any sand or debris. Let them dry completely before beginning the next step.
Mix the Solution: In a bowl, combine one cup of baking soda with half a cup of water. If you wish for color, add a few drops of food coloring to the mixture. Stir slowly until fully combined and a paste forms.
Apply the Crystals: Take a seashell and dip it into the baking soda mixture, ensuring an even coat on the shell’s surface. Use a spoon to help spread the mixture if necessary.
Set to Dry: Place the coated seashells on a baking sheet lined with wax paper or a silicone mat. This will prevent sticking and make cleanup easier.
Wait for the Sparkle: Allow the shells to dry for at least 24 hours. As they dry, the baking soda will crystallize, creating beautiful, sparkling designs.
Final Touches: Once completely dry, gently brush off any excess baking soda crystals with a soft brush, revealing the beauty of your creations.

Using From shell to crystal treasure! Just wait for the sparkle! Would you try this? in Everyday Life
The finished crystal seashells can add a touch of seaside charm to your home. Place them on a windowsill where the sunlight can catch the crystals, illuminating them in a dance of colors. They can also serve as stunning centerpieces on dining tables, or as part of a serene display on a shelf. Each time you glance at your newly crafted treasures, you’ll be reminded of the calming journey you took to create them, enriching your environment with a sense of peace.
How to Store or Reuse From shell to crystal treasure! Just wait for the sparkle! Would you try this?
Caring for your finished shells is straightforward. Store them in a cool, dry place away from sunlight to maintain their brilliance. If you use them for decor, dust them gently with a soft cloth to keep their sparkle intact. Should you ever wish to refresh your seashells, you can gently reapply the baking soda mixture to recreate that dazzling effect.
Gentle Tips & Variations
Experiment with Colors: Try blending different food colors to create unique crystal patterns. A swirl of colors can bring an artistic flair to your shells.
Add Texture: Incorporate different sizes or types of shells for an eclectic look. The varied surfaces may yield fascinating crystal formations.
Create a Themed Display: Group similar hues or types of shells together for a cohesive visual impact on your shelf or table.
Involve Others: This project can be a delightful activity to share with family or friends, making wonderful memories while creating.
Explore Other Crystal Projects: If you enjoy creating these stunning shells, consider trying other crystal-related crafts, like baking soda rainbow crystals that offer a different artistic experience.

FAQs About From shell to crystal treasure! Just wait for the sparkle! Would you try this?
Can I use any type of shell for this project?
Yes, you can use various types of shells! Choosing shells with interesting textures or shapes can enhance the final look of your craft.
How long do I need to let the shells dry?
It’s best to allow your shells to dry for at least 24 hours to ensure the crystals form properly and adhere securely.
Can I use other materials besides baking soda?
While baking soda is the key ingredient for creating these crystals, experimenting with different types of salts may yield different effects if you wish to explore.
What should I do if my shells don’t look as sparkly as I hoped?
If the sparkle isn’t what you expected, try applying another coat of the baking soda mixture and letting it dry longer to enhance the effect.
Is this project safe for children?
Yes, with supervision, this project is safe for children. Be sure to guide them carefully through the mixing and handling process.
Conclusion
The journey of transforming simple seashells into sparkling treasures is not just about the final product; it’s about the mindful experience of creation. This gentle process connects us with nature and encourages us to slow down. For those who cherish poetry and the beauty of expression, exploring resources like Lockdown Poems – Ledbury Poetry Festival or The Poet’s Corner – Ms. Lundberg’s Poetry of the Day can enrich your creative spirit as you embark on your crafting adventures. Embrace the calm that comes with making, allowing your space to be graced by the beauty you’ve created.
PrintDIY Crystal Seashells

Transform ordinary seashells into vibrant, sparkling treasures through a calming DIY project that engages the senses.
- Prep Time: 10 minutes
- Cook Time: 1440 minutes
- Total Time: 1450 minutes
- Yield: 5-10 crystal seashells
- Category: Craft
- Method: DIY
- Cuisine: N/A
- Diet: N/A
Ingredients
- Seashells
- 1 cup Baking soda
- 1/2 cup Water
- Food coloring (optional)
- Bowls for mixing
- Spoon for stirring
- Baking sheet
- Wax paper or silicone mat
Instructions
- Prepare your shells: Rinse your seashells gently under cool water to remove any sand or debris. Let them dry completely before beginning the next step.
- Mix the solution: In a bowl, combine one cup of baking soda with half a cup of water. If you wish for color, add a few drops of food coloring. Stir slowly until fully combined and a paste forms.
- Apply the crystals: Dip a seashell into the baking soda mixture, ensuring an even coat on the shell’s surface. Use a spoon to help spread the mixture if necessary.
- Set to dry: Place the coated seashells on a baking sheet lined with wax paper or a silicone mat.
- Wait for the sparkle: Allow the shells to dry for at least 24 hours. The baking soda will crystallize, creating beautiful designs.
- Final touches: Once dry, gently brush off any excess baking soda crystals with a soft brush.
Notes
Experiment with colors and textures. Perfect for a creative group activity!