

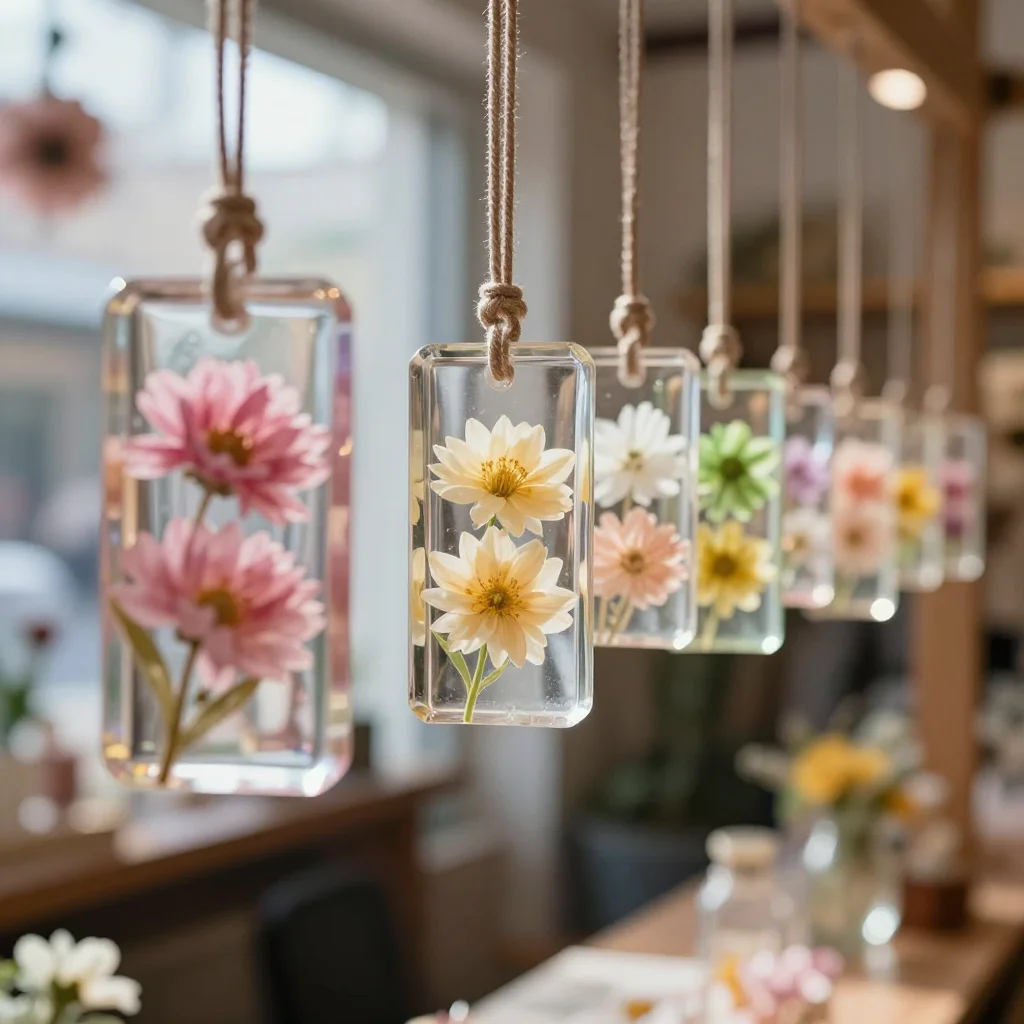
The soft light of the morning sun filters through the window, casting gentle, colorful shadows across the room. It dances playfully over the surfaces, creating a serene atmosphere that invites calm and creativity. In this peaceful moment, you might find inspiration in the idea of making Bioplastic Suncatchers, a delightful craft that sparkles with vibrant hues and captures the essence of nature. This engaging project transcends mere creativity; it offers a unique opportunity to slow down, appreciate textures, and connect with the colors that fill our world.
The Heart Behind This DIY

Creating Bioplastic Suncatchers brings a sense of warmth and joy, much like a cozy blanket wrapped around you on a chilly day. As you gather your materials and prepare to craft, you engage all your senses – the smoothness of the bioplastic, the soft crunch of the colored papers, and the inviting aroma of nature. Each touch invites you to slow down, encouraging a meditative state of mind.
There is something therapeutic about the act of making these suncatchers. Watching the colors meld together, you immerse yourself in the peaceful rhythm of creation. The process allows you to be fully present, letting go of the day’s worries. Each step feels intuitive and grounding, reminding you of the beauty of simplicity. As the sunlight filters through these handmade pieces, it illuminates your space, filling your heart with warmth and light.
How This DIY Comes Together

As you prepare for this journey of creation, envision the flow of making Bioplastic Suncatchers. The act of handling the materials becomes a dance of texture and color. The smooth bioplastic melts gently, combining with vibrant hues to create enchanting patterns. Carefully pouring, swirling, and pouring again, you can hear the soft sound of the mixture blending. Each moment unfolds at a comfortable pace, encouraging you to savor the process.
While embarking on this delightful craft, be mindful of the simplicity of your surroundings. Allow yourself to be absorbed by the colors you choose and the various patterns that emerge. Focus on the shapes and how they harmonize with one another, creating a visual rhythm that is as soothing as the project itself.
Simple Supplies for This DIY
Gather your materials to embark on this crafting journey. Here is a gentle list of what you will need:
- Bioplastic (cornstarch-based is common; easy to find)
- Food coloring (various shades for colorful designs)
- Wax paper or parchment paper (to protect surfaces)
- A small pot (for melting the bioplastic)
- Cookie cutters or molds (for shaping)
- A stirring utensil (wooden or silicone works well)
- An oven (set at a low temperature for drying)
- Optional: glitter or natural items like leaves (for added texture)
As you gather your supplies, take a moment to feel the different textures in your hands, from the smooth surfaces of bioplastic to the crinkled paper. Allow this tactile experience to enhance your calmness and excitement.
Step-by-Step Directions

-
Start by preparing your workspace. Lay out the wax paper or parchment paper on a flat surface to catch any spills and protect your area. This step sets the stage for a peaceful crafting experience.
-
In a small pot, combine the bioplastic with a little water and heat gently. As the mixture melts, stir slowly with your chosen utensil. Pay attention to how the texture transforms from solid to a smooth, gooey consistency.
-
Once melted, remove the pot from the heat. Divide the mixture into smaller bowls, adding food coloring to each. Swirl the colors to create a marbled effect or leave them solid for vibrant layers, focusing on the visual beauty of blending hues.
-
Using your cookie cutters or molds, pour the colored bioplastic into desired shapes. Experiment with layering different colors and patterns, allowing the soft mixture to flow gracefully into the molds.
-
Allow the shaped bioplastic to cool and set for about 10 minutes. You will notice the gentle aroma of corn and sweetness in the air. Embrace this moment of stillness as the mixture begins to solidify.
-
Preheat your oven to a low temperature, usually around 200°F (93°C). Carefully place the molds on a baking sheet and let them bake for about 15-30 minutes, depending on their thickness. Take a moment to breathe in the comforting warmth from the oven, reminding you of sunny days.
-
Once the suncatchers are firm, remove them from the oven and let them cool completely. When ready, gently pop them out of the molds and place them on a soft cloth. This final touch adds a soothing ending to your creative process.
-
Consider using a hole punch to create a small hole for hanging. Thread a ribbon or string through this hole to prepare your beautiful suncatcher for display.
Where This DIY Fits Into a Calm Routine
Creating Bioplastic Suncatchers brings beauty into your space while promoting a sense of tranquillity. Hang your finished pieces in windows where sunlight can filter through, casting colorful patterns across walls and furniture.
You might find joy in observing how the light changes with the time of day, shifting colors in a dance that speaks to the heart. Perhaps you can place them in quiet corners of your home, creating little pockets of beauty and light.
Sharing these suncatchers with loved ones also spreads warmth and joy. Gift them as tokens of caring, matching their colors to the personality of the recipient. Each suncatcher becomes a cherished piece, a reminder of the gentle moments spent creating together.
Making This DIY Last
Caring for your suncatchers involves simple, gentle practices. Keep them clean by gently dusting them with a soft cloth. If they gather moisture, avoid harsh cleaning methods. Lightly wipe them down with a damp cloth and allow them to air dry.
Consider removing them from direct sunlight if you notice fading. While these suncatchers are made with durable bioplastic, protecting them from harsh conditions keeps their colors vibrant and inviting. When it’s time to change their position, feel free to store them carefully in a soft box or a drawer to protect them until you’re ready to display them anew.
Gentle Tips & Variations
As you engage with the craft of making Bioplastic Suncatchers, consider the following gentle invitations for customization:
-
Explore different shapes and sizes. If cookie cutters don’t speak to you, look for natural objects like leaves or stones to create unique molds that showcase nature’s beauty.
-
Try using natural dyes instead of food coloring. This approach not only adds a unique touch but also connects you further with the earth.
-
Test various layering techniques. Combine thicker and thinner layers of color for added depth. The process of watching these colors flow together can be quite calming.
-
Create a themed set for seasonal celebrations. Imagine hues of orange, yellow, and red for autumn, or blues and whites for a winter wonderland. The joy of connecting seasons with your crafts enhances the experience.
-
Share your creations. Crafting becomes even more meaningful when shared with others. Host a friend over for a cozy making session or gift a finished piece to someone special.
FAQs About Bioplastic Suncatchers: A Natural, Colorful Craft
Can I use other types of molds?
Absolutely! You can use silicone molds or even shape them by hand. Let your creativity flow as you explore different designs.
What if my suncatchers are too thin?
If your suncatchers break easily, they could be too thin. Next time, pour a bit more mixture or layer the colors more carefully to build strength.
How can I change the colors?
Use different shades or mix colors to create gradients. Experimentation can reveal beautiful surprises with each piece.
Is there an alternative method to create the same effect?
You can explore making suncatchers with colorful glue or baking soda ornaments. Both options are rewarding and add unique characteristics to your handmade pieces.
How do I store them if I don’t want to display them right away?
Store your suncatchers in a soft cloth or box away from direct sunlight to prevent fading and damage. This gentle care keeps your creations safe until you’re ready to share them.
Conclusion
As you think back on your experience making Bioplastic Suncatchers, it’s a gentle reminder of the joy that creation brings to our lives. Each moment spent crafting feels valuable, providing an opportunity to connect with colors, textures, and calming rhythms. The world flows beautifully when we allow ourselves these moments of intentionality and creativity.
If you wish to explore more about bioplastic suncatchers, check out this helpful guide to delve deeper into various techniques. Additionally, you can find inspiration from this delightful resource to spark even more creativity. Embrace the unique beauty of your handmade pieces and continue to let your imagination shine.
PrintBioplastic Suncatchers

Create vibrant and colorful bioplastic suncatchers that capture the essence of nature and bring joy to your space.
- Prep Time: 15 minutes
- Cook Time: 30 minutes
- Total Time: 45 minutes
- Yield: 4 suncatchers
- Category: Craft
- Method: Baking
- Cuisine: N/A
- Diet: N/A
Ingredients
- Bioplastic (cornstarch-based)
- Food coloring (various shades)
- Wax paper or parchment paper
- A small pot
- Cookie cutters or molds
- A stirring utensil (wooden or silicone)
- An oven (set at a low temperature)
- Optional: glitter or natural items like leaves
Instructions
- Start by preparing your workspace. Lay out the wax paper or parchment paper on a flat surface to protect your area.
- In a small pot, combine the bioplastic with a little water and heat gently. Stir slowly as it melts into a smooth consistency.
- Once melted, remove the pot from heat. Divide the mixture into bowls, adding food coloring to swirl colors or leave them solid.
- Using cookie cutters or molds, pour the colored bioplastic into desired shapes, experimenting with layering colors.
- Allow the shaped bioplastic to cool and set for about 10 minutes.
- Preheat your oven to a low temperature (around 200°F / 93°C). Place molds on a baking sheet and bake for 15-30 minutes based on thickness.
- Once firm, remove them from the oven and let them cool completely.
- Consider using a hole punch to create a small hole for hanging, then thread a ribbon or string through.
Notes
Gently dust suncatchers with a soft cloth for cleaning, and store out of direct sunlight to maintain vibrancy.