

Creating plastic at home from natural materials can evoke a curious sense of wonder. Picture the smoothness of warm cornstarch, the earthy aroma of a cozy kitchen, and the rhythmic sound of stirring gently in a pot. As you blend these ingredients, you’re not just participating in a craft project; you’re invoking a deeper connection to your creativity and your environment. This process beautifully illustrates how you can make plastic at home… from THIS?!
The Heart Behind This DIY

This project offers more than just a chance to make something tangible. Engaging in the act of crafting plastic can slow down racing thoughts and focus your mind on the sensory experience at hand. As you gather your materials, each element brings its unique texture and scent, inviting you to be present in the moment. The warmth of the stove beneath your hands, the way the ingredients transform under gentle heat, fosters a feeling of calm and grounding.
Making your own bioplastic softens the boundary between what is artificial and what is organic. It encourages us to reflect on our consumption habits while inviting creativity into our homes. Each step in the process brings a gentle reminder that creation can be both purposeful and fulfilling.
A Gentle Look at the Process
As you prepare to make your own bioplastic, there’s a lovely rhythm to anticipate. Imagine the way the cornstarch feels between your fingers, the way the water glides as you pour, and the gentle simmering sound as everything melds together. This is a journey where mindful making takes precedence.
You’ll witness the cornstarch dissolve and transform, slowly changing into a pliable, warm substance. The visual shift from dry powder to sticky mix is as rewarding as the final product. Each moment draws you deeper into the process, making it feel serene and satisfying.
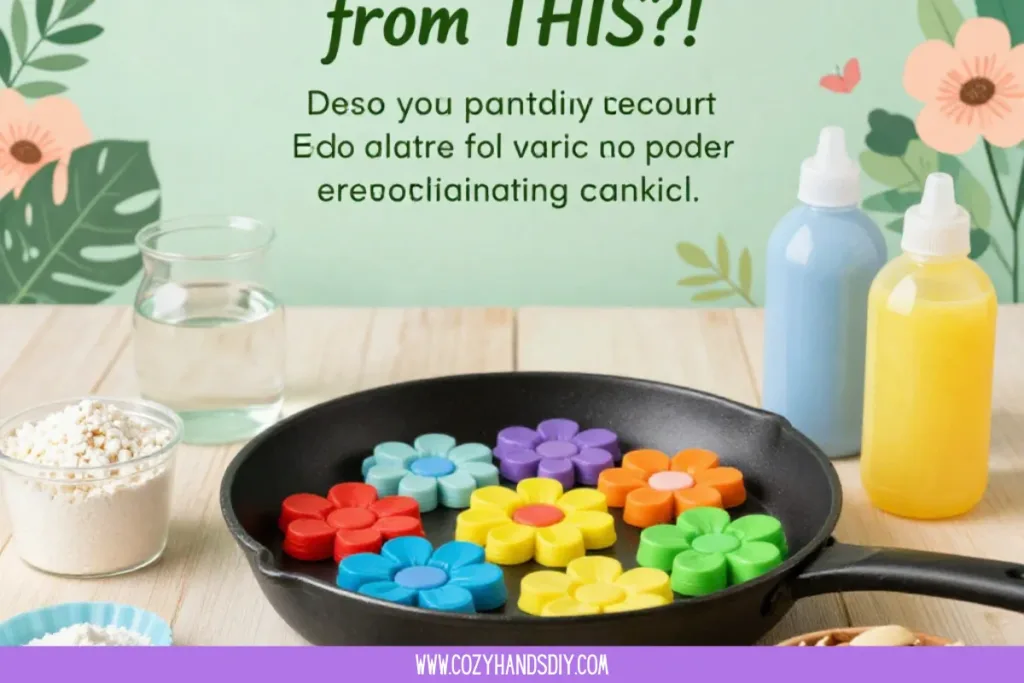
Materials You’ll Need
Start by gathering these simple ingredients and tools:
- 1 cup cornstarch (easy to find at any grocery store)
- 1 cup water
- 1 tablespoon white vinegar (preserves the material)
- 1 tablespoon glycerin (adds flexibility)
- Non-stick pot (to avoid mess)
- Stirring utensil (wood or silicone works well)
- Measuring cups
- Baking parchment or silicone mat (to cool the plastic)
- Food coloring (optional, for fun)
These materials are accessible and offer a chance to explore different textures and properties. You might even find joy in substituting materials based on what you have at home.
Step-by-Step Directions
Begin by mixing the cornstarch and water in a non-stick pot. Feel the granules as they touch the water, letting them settle together.
Add the white vinegar and glycerin to the pot. Stir gently until everything is combined. Notice how the mixture starts feeling thicker.
Place the pot on low heat. As the heat rises, stir slowly and consistently. Enjoy the soothing sounds of texture changing around you.
Once the mixture starts to bubble and becomes sticky, remove it from the heat. It should resemble a thick paste—smooth and warm to the touch.
Pour the mixture onto a piece of baking parchment or a silicone mat. Work quickly before it cools. You can spread it out into your desired shape or cut it later.
Allow the bioplastic to cool completely. This may take a few hours, depending on how thick it is spread out.
Once cooled, you can cut or mold your bioplastic into the desired shapes. Feel the change in texture as it hardens.
You now have a simple form of bioplastic to keep or use. Reflect on the joy of crafting something with your own hands.
Enjoying the Finished Piece

Once the bioplastic has cooled, it opens up a world of possibilities. You may choose to shape your plastic into charms, ornaments, or useful items for your home. Picture a colorful pendant hanging in the sunlight or a unique coaster for your favorite mug. Each piece tells a story of your intention and creativity.
Placing these creations around your space can gently remind you of the calming process you engaged in. They become not only functional items but also artifacts of mindfulness, enhancing the warmth and comfort of your surroundings.
Making This DIY Last
Looking after your bioplastic is crucial for maintaining its integrity. Store your creations in a cool, dry place. If they become too soft over time, you can return them to the warmth of your hands to reshape. You might also consider options for recycling any worn-out pieces, blending the old into new creations.
Being mindful of how you use and care for your handmade plastic keeps the spirit of this project alive. It encourages a sustainable mindset and appreciation for the resources we have at hand.
Gentle Tips & Variations
There are many gentle ways to make this project your own. Here are a few invitations to explore further:
Add Essential Oils: A few drops can impart a lovely scent to your bioplastic, making it feel even cozier. Choose a calming fragrance, like lavender or eucalyptus.
Experiment with Colors: Use food coloring to create unique effects. Try mixing colors to discover unexpected shades.
Create Textured Patterns: While the plastic is still warm and pliable, press leaves, lace, or textured surfaces into it for interesting designs.
Make a Gift: Consider shaping your bioplastic into something special for a friend. A handmade gift adds a personal touch that is both meaningful and delightful.
Document Your Process: Keep a little journal of your making moments. Write down thoughts, feelings, and any insight gained during this creative journey.

FAQs About You can make plastic at home… from THIS?!
Q: Can I use any type of cornstarch?
A: Yes, any standard cornstarch will work well. Cornstarch has unique properties that create the right consistency for the bioplastic.
Q: How long will the bioplastic last?
A: The lifespan can vary based on use and environmental factors. Generally, it lasts for several months if stored properly away from humidity.
Q: Can I add glitter or other materials?
A: Yes! Adding glitter can give your bioplastic a fun sparkle. Just remember that it may decrease the texture.
Q: Is this bioplastic biodegradable?
A: Yes, it is biodegradable and is a more eco-friendly option compared to conventional plastics, making it a great choice for mindful crafting.
Q: Can this bioplastic be used for food items?
A: It is best to avoid using it for food, as the durability and cleanliness could be questionable over time.
Conclusion
Creating plastic from natural ingredients offers a soothing journey into mindful making. It is a gentle reminder of the materials we use and the beauty of crafting with our hands. As you explore this project, you can take pride in your creativity and the playful possibilities that arise.
If you’re interested in expanding your knowledge about materials, you may find value in understanding the various types of plastics and recycling methods through resources like The 7 Types of Plastic You Need to Know. For those looking to explore crafting more, consider checking out private parties at places like Aster Gardens to expand your creative community. Enjoy crafting with calm presence, and let each project become a cherished reflection of your gentle creativity.
PrintHomemade Bioplastic from Natural Materials

Learn how to make your own bioplastic using simple, natural ingredients. This DIY project is not only fun but also eco-friendly.
- Prep Time: 15 minutes
- Cook Time: 10 minutes
- Total Time: 25 minutes
- Yield: 1 batch of bioplastic
- Category: Craft
- Method: Stovetop
- Cuisine: N/A
- Diet: N/A
Ingredients
- 1 cup cornstarch
- 1 cup water
- 1 tablespoon white vinegar
- 1 tablespoon glycerin
- Non-stick pot
- Stirring utensil
- Measuring cups
- Baking parchment or silicone mat
- Food coloring (optional)
Instructions
- Mix the cornstarch and water in a non-stick pot.
- Add the white vinegar and glycerin to the pot. Stir gently until everything is combined.
- Place the pot on low heat. Stir slowly and consistently.
- Once the mixture starts to bubble and becomes sticky, remove it from the heat.
- Pour the mixture onto a piece of baking parchment or a silicone mat.
- Allow the bioplastic to cool completely.
- Once cooled, you can cut or mold your bioplastic into desired shapes.
- Enjoy your homemade bioplastic creations!
Notes
Store bioplastic creations in a cool, dry place. Reshape if they become too soft.