

I hold a cool, speckled egg in the soft light of the kitchen window and watch a tiny rainbow bloom where a drop of paint meets shell. The fizz feels like a small, private storm that lasts a second and then settles into something quiet and matte. Making Baking Soda Painted Easter Eggs slows my hands and sharpens my attention. The textures, the delicate cracking sounds of shells, and the slow reveal of color invite a gentle focus that feels like a little breathing practice.
Why Baking Soda Painted Easter Eggs Feels Comforting to Create

This craft gives you small, sensory-rich moments. The fizz of vinegar and baking soda creates a brief, lively sound. The baking soda paints a soft, velvety layer that dries to a chalky matte. You watch color mingle in tiny islands and then decide to leave it or nudge it with another drop. That decision brings calm because it keeps the pace slow and kind.
I like to think of this as a soothing, repetitive ritual. You prepare simple mixtures, dip, drip, and wait. The rhythm feels like stirring tea or knitting a few gentle rows. If you want a touch of extra cozy, try soft music in the background and work near a window. When I make these eggs with children, the process grounds the room. Everyone waits for the fizz, gasps soft, and then finds a new quiet.
This project also connects to other playful experiments if you enjoy baking soda activities, like the fizzing sheets in our baking soda and vinegar fireworks fun. That link leads to another sensory moment you can try before or after egg painting with a slightly different energy and a lot of tactile curiosity. baking soda and vinegar fireworks fun
The Flow of Making Baking Soda Painted Easter Eggs
I like to begin by laying out everything I need. The visual order soothes me. The bottles line up. The bowls sit in a row. The eggs rest on a towel.
The flow moves from quiet prep to lively marks and back to gentle drying. You start by choosing shells and making paints or fizz solutions. You move to steady hands that dip droppers or brushes and watch the paint react. Then you step back and let the eggs rest, noticing the little changes as the paint settles.
This process mirrors other baking soda experiments I enjoy for the way it balances surprise and control. If you like the fizzy reactions, you might also enjoy the more dramatic fizz of our baking soda and vinegar fireworks post, which helps you understand how the acid and base interact. baking soda and vinegar fireworks
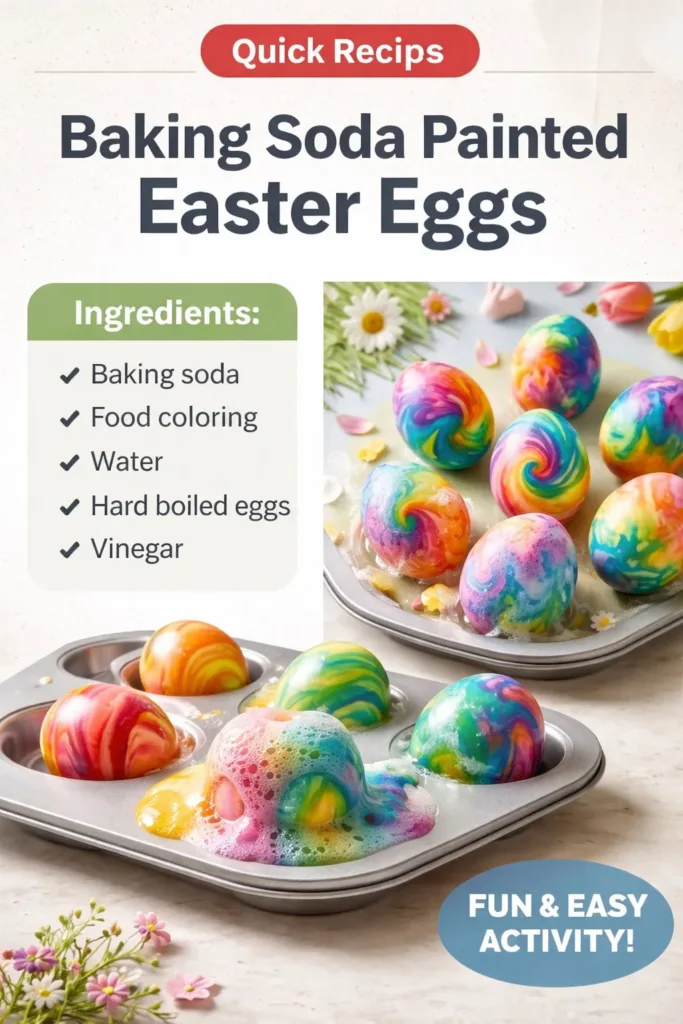
Materials You’ll Need
- Eggs (hard-boiled for eating, or blown shells for keepsakes)
- Baking soda (easy to find)
- White vinegar (mild, safe)
- Liquid food coloring or liquid watercolors (choose soft colors)
- Small jars or cups for mixing
- Pipettes or droppers (optional, for gentle control)
- Soft paintbrushes (small round brushes work well)
- Measuring spoons
- Paper towels or a cloth (for tidy work)
- A tray or shallow box to catch drips
- Gloves (optional, if you prefer to keep your hands color-free)
- A drying rack or egg carton with soft padding
Note on choices: Liquid watercolors give a softer, translucent finish. Liquid food coloring gives brighter spots and runs. You can substitute either depending on what feels right. For longer-lasting keepsakes, use blown shells so you do not use eggs intended for eating.
I sometimes keep a small jar of plain baking soda paint ready for textured detail. You get a matte, chalky effect that looks like old plaster. For a fizzier, marbled look, you use colored vinegar drops on a baking soda base. Both feel satisfying in different ways.
Step-by-Step Directions
Prepare your eggs with gentle care. Hard-boil eggs if you plan to eat them later, or blow them out for long-term decoration. Pat shells dry and set them on a soft towel. Handle slowly so they do not crack.
Make a baking soda paint: mix one tablespoon of baking soda with a little water until you get a smooth, slightly thick paste. The texture should feel silky and spreadable on a spoon.
Create colored vinegar drops: pour white vinegar into jars and add a few drops of liquid food coloring or liquid watercolor. Swirl gently. The color will sit in the vinegar and fizz when it meets baking soda.
Paint a base layer if you like a soft, chalky ground. Use a small brush to apply the baking soda paste in thin strokes. Let it rest for a minute; the paste dries to a velvety matte.
Use a dropper or pipette to place colored vinegar drops onto the baking soda paste. Watch the tiny fizz and the pigment move. Pause between drops to enjoy the moment and decide where to place the next one.
For a softer marbled look, mix a little baking soda into a thicker, paint-like slurry and tint it with color. Brush that on in gentle curves, then add a few vinegar drops for subtle texture.
If you prefer speckles, flick a brush loaded with colored vinegar near the shell and let tiny droplets meet the baking soda. You will hear faint taps and see speckles bloom.
Allow eggs to dry undisturbed. The drying phase feels important. The paste sets and the colors soften. If you used hard-boiled eggs, keep them refrigerated until you plan to eat or display them.
Once dry, decide on finishing touches. You can leave the surface matte, seal it with a light wax if you want a soft sheen, or softly buff with a dry cloth to warm the color. Take a breath and admire each small surface.
Each step should feel like a choice, not a race. Pause when you want. Let your hands and eyes guide you.
Bringing Baking Soda Painted Easter Eggs Into Your Space


These eggs fit gently into a few simple displays. Nest a few in a shallow wooden bowl surrounded by moss or dried grasses. Place a single, carefully decorated egg on a small ceramic saucer as a quiet table accent. Arrange a cluster in a long tray lined with linen for a soft centerpiece.
I like to mix textures. Put a few matte, baking soda painted eggs next to glossy dyed ones for contrast. The chalky finish soothes the eye and invites touch. If you plan to use them in a seasonal arrangement, choose muted colors and natural materials. This creates a calming palette that feels cohesive and gentle.
For displays that children will touch, place eggs on a low tray where they can lift them without reaching. If you made blown shells, treat them like tiny sculptures. A single egg on a shelf can bring a quiet, intentional pause to a room.
How to Store or Reuse Baking Soda Painted Easter Eggs
If you used hard-boiled eggs for display, keep them cool and plan to eat them within a week. Label them in the fridge so they do not linger past their safe time.
For blown shells or sealed decorative eggs, store them in a padded box. Wrap each egg in acid-free tissue or soft cotton. Use individual compartments if you can. A simple shoebox with dividers works well for a small collection.
You can also reuse eggs as seasonal tokens. Tuck a painted egg into a wrapped gift. Keep a few as year-to-year ornaments that you bring out each spring. If you used a temporary surface paste, you might refresh the eggs by lightly sanding a rough area and adding another thin layer of baking soda paint for a gentle update.
If any color flakes or dust appears over time, gently brush the surface with a soft brush. Avoid soaking or harsh cleaners. Treat each shell with quiet care and it will reward you with many seasons of calm presence.
Gentle Tips & Variations
Invite texture: mix a spoon of cornstarch with the baking soda paste for a slightly creamier feel. It softens the matte finish and feels pleasant on the brush.
Try layered color: paint a pale base, let it dry, then add small vinegar drops of a stronger color. The result looks like watercolor on plaster and surprises you with depth.
Use natural dyes as a companion: after you make baking soda details, try dipping a boiled egg in onion skin or beet dye for a muted background. The baking soda marks remain a gentle highlight.
Make it a sensory table: set up bowls with different scents like a small sprig of lavender or a strip of lemon peel near your station. Smell grounds you while you work.
If you like, explore crystal-like textures from other projects such as the baking soda crystal growing tree for ideas on how to add sparkling accents to a base. baking soda crystal growing tree
Treat these tips as invitations. Use one or two that call to you. You do not need to do them all.
FAQs About Baking Soda Painted Easter Eggs
Q: Can I eat eggs that have been painted with baking soda paint?
A: Yes, if you used simple baking soda, water, and food-based color on hard-boiled eggs you intend to eat, they are safe if you keep them refrigerated and eat them within a week. Do not use blown shells or eggs painted with sealing wax if you plan to eat them.
Q: Will the fizzing reaction harm the egg shell?
A: The fizz is a surface reaction and does not harm the shell. The sound might feel dramatic, but the shell remains intact. Work gently and avoid dropping the egg during the process.
Q: Can I make baking soda paint in advance?
A: You can make a small batch and cover it airtight for a day or two. The paste may dry slightly; stir in a few drops of water to refresh its texture. For the most playful fizz, mix the colored vinegar just before use.
Q: What tools work best for fine detail?
A: Small round brushes and pipettes give you precise control. Cotton swabs help soften edges. A fine-tipped squeeze bottle can place tiny drops of colored vinegar exactly where you want them.
Q: How do I keep the colors from fading over time?
A: For long-term keepsakes, consider sealing blown shells with a clear matte spray or beeswax polish. Test a small area first so you like the finish. Store away from direct sunlight to prevent gentle fading.
A Quiet Closing Thought
Sit with your finished eggs for a moment. Notice the quiet textures, the places where color pooled and where it barely touched. Each egg tells a small story about a slow hand, a patient pause, and a curious breath.
If you want to try a slightly different approach or learn a new technique to pair with this project, you might enjoy the detailed steps in another baking soda paint take. For a variety of creative approaches to egg decorating, see DIY Baking Soda Paint Easter Eggs – Dream a Little Bigger. For general inspiration on egg decorating techniques, take a look at Easter Egg Painting – Casa de Casey.
Enjoy the quiet work. Let each drop and brushstroke slow you down. Return to the table when you want more small, mindful making.
PrintBaking Soda Painted Easter Eggs

Create beautiful and unique Easter eggs using a combination of baking soda and food coloring for a fun and sensory-rich experience.
- Prep Time: 15 minutes
- Cook Time: 0 minutes
- Total Time: 15 minutes
- Yield: 4 eggs
- Category: Craft
- Method: Painting
- Cuisine: American
- Diet: Vegetarian
Ingredients
- Eggs (hard-boiled for eating or blown shells for decoration)
- Baking soda
- White vinegar
- Liquid food coloring or liquid watercolors
- Small jars or cups for mixing
- Pipettes or droppers (optional)
- Soft paintbrushes (small round brushes)
- Measuring spoons
- Paper towels or a cloth
- A tray or shallow box to catch drips
- Gloves (optional)
- A drying rack or egg carton with soft padding
Instructions
- Prepare your eggs with gentle care.
- Make a baking soda paint: mix one tablespoon of baking soda with a little water until smooth.
- Create colored vinegar drops by adding liquid food coloring to white vinegar and swirl gently.
- Paint a base layer using the baking soda paste with a small brush.
- Use a dropper to place colored vinegar drops onto the baking soda paste.
- For a marbled look, mix baking soda with color and brush it on.
- Flick a brush loaded with colored vinegar to create speckles.
- Allow the eggs to dry undisturbed.
- Finish with optional sealing or buffing for sheen.
Notes
For longer-lasting keepsakes, use blown shells instead of hard-boiled eggs.