

The wooden table smells faintly of vinegar and lemon soap. Morning light slips across a shallow bowl of pastel paint that catches tiny bubbles on the surface. I rest my palm near an egg, feeling the cool, smooth curve and the soft grit of baking soda paint as my brush leaves a trail. Making Baking Soda Painted Easter Eggs slows me down, one small, mindful motion at a time.
In a quiet corner I first tried this because I wanted texture that felt like a whisper. The paint dries matte and slightly chalky, and the fizz when vinegar meets baking soda makes a soft, tiny pop that surprises me into laughter. If you like gentle experiments that double as seasonal keepsakes, you might enjoy our baking soda fireworks activity for little hands, which shares the same fizzy, sensory joy.
Why Baking Soda Painted Easter Eggs Feels Comforting to Create

This project invites slow attention. You press a damp brush to an egg, watch color bloom, and then wait for the paint to change as it dries. The baking soda keeps the colors soft and muted, like chalk, so the finished eggs sit quietly in a bowl rather than shout for attention.
I often make these when the day feels crowded. The simple palette of pastel paints calms my eyes. The sound of a small pipette dropping vinegar on a painted patch makes me notice the moment. The texture is satisfyingly tactile: a gentle grain from the baking soda, smooth brush strokes, and tiny cratered bits where bubbles popped. This combination of sight, sound, and touch helps me slow down and enjoy the act of making.
The method also fits into low-energy rhythms. You can paint one side and go make tea, then come back to finish. You can invite a child to drop vinegar while you steady the egg. It offers small, shared pauses that feel intentional and kind.
The Flow of Making Baking Soda Painted Easter Eggs
Before you gather materials, picture the gentle steps: mix paint to a creamy yogurt texture, coat eggs in soft swaths, and decide whether to let the paint dry or to add vinegar for fizz and texture. Movement matters more than speed. Slow, steady brush strokes feel better than hurried dabs.
Listen for soft sounds. When vinegar hits the painted surface, you will hear a faint sizzle and see tiny bubbles form and then fade. That moment feels like a small ritual. The visual rhythm of layering colors, letting each layer rest, and then adding a tiny energetic fizz makes the process feel like a calm conversation between materials.
If you enjoy the sensory fizz in other projects, I find it pairs well with seasonal activities. For a different kind of baking soda play, try reading about the related fizzing fireworks experiment in our notes about baking soda and vinegar fireworks, which uses a similar reaction on a larger, more dramatic scale.
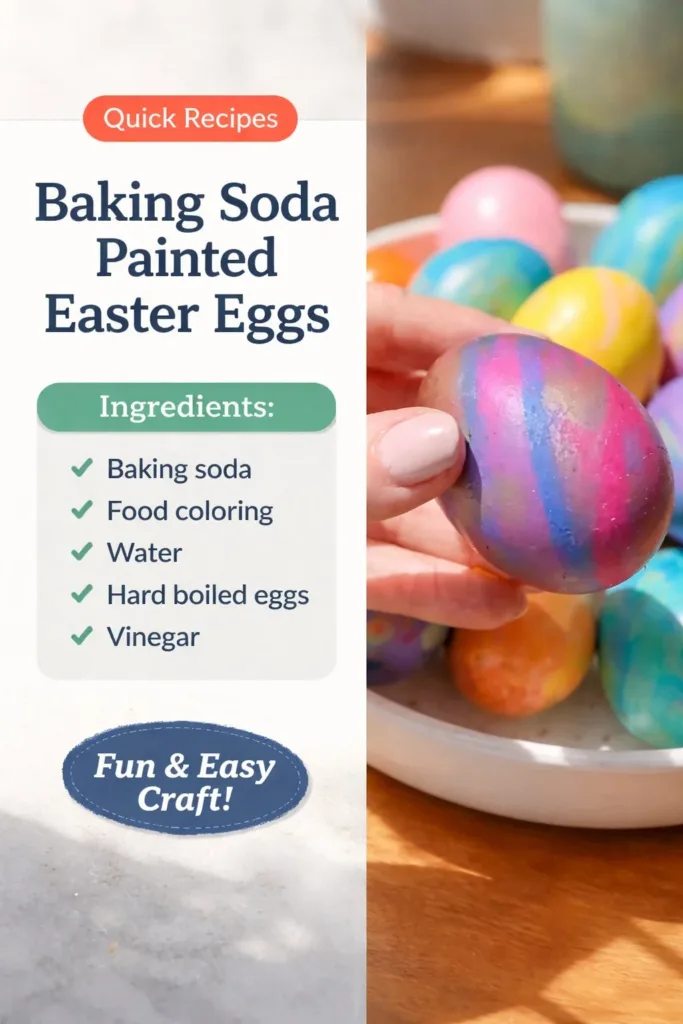
Materials You’ll Need
- Eggs, hard-boiled or blown out, clean and dry (easy to find)
- Baking soda (sodium bicarbonate) — this creates the soft, matte texture
- White vinegar in a small cup or dropper bottle — used for fizzing effects, optional
- Food coloring or liquid watercolors — choose soft shades
- Small bowls or cups for mixing — washable
- Spoons for stirring
- Brushes of various sizes — small round brushes feel calm to use
- Pipette or straw for adding vinegar drops (optional) — creates controlled fizz
- Paper towels and a protective mat or newspaper
- A drying rack, egg carton, or borrowed mug to cradle eggs while they dry
- Clear matte sealer or decoupage glue for display eggs (optional, not food safe)
- Gloves (optional) if you prefer not to dye your hands
Notes: Food coloring gives soft, edible-safe tones if you stick to real food-safe dyes, but keep in mind painted eggs should not be eaten if the shells get pierced or if non-food-safe sealers are used. Liquid watercolors give more translucent layers and are gentle to work with. Everything here is easy to find at grocery or craft stores.
Step-by-Step Directions
Prepare your eggs and workspace.
Place eggs on a soft surface and cover your table with a mat.
Have paint bowls, brushes, and paper towels within reach.Make the baking soda paint.
Mix two parts baking soda with one part water and stir to a smooth, creamy paste.
Add a few drops of food coloring until you like the shade; the texture should feel like thick yogurt.Test the paint on paper first.
Brush a small stroke and let it dry to see the matte finish and final color.
Adjust the mix by adding a little water for flow or more baking soda for stiffness.Paint the first layer gently.
With light, even strokes, cover the egg in thin coats.
Work slowly around the curve and rest between sections to steady your hand.Let the layer dry to a slightly damp finish for a soft effect.
If you prefer a smooth chalk look, allow the paint to dry fully.
For a textured look, proceed to the fizz step while the paint is still damp.Add vinegar for fizz and texture, if you like.
Use a pipette or dropper to place small drops of vinegar where you want tiny craters.
Watch as the bubbles lift pigment and create marbled textures; this happens fast, so pause and breathe as you watch.Layer colors for depth.
After fizzing, let the egg dry, then paint over with a second color for gentle veining.
You can add subtle washes of color with diluted baking soda paint to build mood.Finish and protect your eggs for display.
Once fully dry, you can leave eggs as they are for a soft, chalk finish.
If you want longer-lasting pieces, apply a light coat of clear matte sealer or decoupage glue; this makes them for display only.Clean up calmly.
Soak brushes right away to keep bristles soft.
Wipe your work area and tuck eggs into an egg carton to dry fully.
Bringing Baking Soda Painted Easter Eggs Into Your Space


The finished eggs feel at home in many places. A simple cardboard egg tray lined with linen looks quiet and intentional. A low bowl of these eggs on a windowsill becomes a slow centerpiece that changes with light through the day.
I like to tuck one or two painted eggs into a bookshelf header or among spring branches in a vase. They add a small pause for the eye without becoming clutter. If you make a set of varying sizes, they form a gentle color study when grouped together.
For seasonal rituals, place a few on a mantel or breakfast table for a relaxed morning ritual. I often set them alongside a small candle and a folded note for guests, so the act of noticing becomes part of the visit. If you enjoy combining tactile projects, these eggs sit well with other homemade ornaments; you can read about creating soft cloud-like ornaments in our project notes about baking soda colorful cloud ornaments for gentle decor ideas.
How to Store or Reuse Baking Soda Painted Easter Eggs
If you used hard-boiled eggs, keep in mind they are not meant for long-term display. Painted hard-boiled eggs will last a day or two in cool temperatures, but they will spoil if left at room temperature for too long.
For keepsakes, use blown eggs or craft eggs. Once dry and sealed with a matte finish, they keep well in a cool, dry box. Wrap each egg in tissue paper and place them in a small box or egg carton to protect the paint from rubbing.
If you love changing small displays, consider reusing the eggs as part of seasonal staging. Store them with other simple objects like wooden beads or linen ribbon to create new combinations each year. Avoid direct sun to prevent fading, and keep them in a place where curious hands or pets cannot reach them.
Calm Customization Ideas
Try layered pastels.
Paint a base color, let it dry, then overlay another thin wash to create soft depth. This builds color slowly and feels meditative.Add metallic highlights sparingly.
After the paint dries, use a tiny brush and metallic acrylic to gently kiss edges or lines. A whisper of gold or silver brings warmth without overpowering the matte texture.Use stencils for subtle patterns.
Lightly dab paint through a small stencil to leave faint shapes. This small motion creates rhythm and calm precision.Make a hanging garland with twine.
Carefully wrap a short ribbon around the widest part of a sealed craft egg and tie it into a loop. Cluster several for a slow, suspended display.Invite science play with the fizz.
If you enjoy the chemical reaction, explore larger experiments and gentle sensory craft ideas, like our baking soda crystal growing tree, which uses similar materials for a different, slow-growing result.
These suggestions are invitations. Let your hands choose what feels right and leave room to change your mind.
FAQs About Baking Soda Painted Easter Eggs
Q: Are these eggs safe to eat after painting?
A: If you use food-safe dyes and avoid piercing the shell, painted hard-boiled eggs may still be edible short term, but I recommend using decorated eggs for display only if you added sealers or non-food-safe finishes. For keepsakes, use blown or craft eggs.
Q: How long do they take to dry?
A: Thin layers dry within 30 minutes to an hour. If you use multiple layers or add vinegar fizz, allow 12 to 24 hours for full curing before sealing or handling frequently.
Q: Can small children do this project?
A: Yes, with supervision. Children enjoy adding drops of vinegar and watching bubbles form. Use non-toxic food coloring, keep the workspace covered, and tidy up spills gently together. Young children will need help holding eggs steady.
Q: What causes the bubbles and texture?
A: Baking soda reacts with vinegar, producing carbon dioxide gas bubbles. These bubbles create tiny craters and lift pigment, leaving soft, textured marks. The baking soda itself dries to a matte, chalky finish that feels gentle to the touch.
Q: Can I make this without vinegar?
A: Absolutely. Painting with baking soda paint alone gives a soft, chalky finish with subtle texture. Vinegar adds a playful fizzy moment, but it is optional.
A Gentle Note Before You Go
Take a moment to hold a painted egg in both hands. Notice the temperature of the shell, the quiet texture of the paint, the way light catches a tiny metallic fleck if you used one. These little objects carry time and attention. They become gentle reminders to slow down, notice small changes, and return to making with calm hands.
There is no perfect outcome to chase here. A soft streak, a tiny crater, and an uneven line all tell the honest story of a quiet afternoon. Let the process itself be the point, and let your finished eggs find a simple place where they can remind you of that calm.
Conclusion
For a step-by-step version of this idea that emphasizes the fizzy paint technique, I often look to the clear, friendly instructions in DIY Baking Soda Paint Easter Eggs – Dream a Little Bigger for extra inspiration. If you want more varied painting ideas and family-friendly techniques for egg decorating, the gentle suggestions in Easter Egg Painting – Casa de Casey make helpful companions on another cozy creative day. Enjoy the simple rhythm of this craft and return to it whenever you want to slow your hands and your mind.
PrintBaking Soda Painted Easter Eggs

A delightful craft project that combines baking soda and food coloring to create uniquely textured and softly colored Easter eggs.
- Prep Time: 15 minutes
- Cook Time: 60 minutes
- Total Time: 75 minutes
- Yield: 6 eggs
- Category: Craft
- Method: Painting
- Cuisine: N/A
- Diet: N/A
Ingredients
- Eggs (hard-boiled or blown out, clean and dry)
- Baking soda (sodium bicarbonate)
- White vinegar (optional)
- Food coloring or liquid watercolors
- Small bowls or cups for mixing
- Spoons for stirring
- Brushes of various sizes
- Pipette or straw for adding vinegar drops (optional)
- Paper towels and a protective mat or newspaper
- A drying rack, egg carton, or borrowed mug
- Clear matte sealer or decoupage glue (optional)
- Gloves (optional)
Instructions
- Prepare your eggs and workspace.
- Make the baking soda paint.
- Test the paint on paper first.
- Paint the first layer gently.
- Let the layer dry to a slightly damp finish.
- Add vinegar for fizz and texture, if you like.
- Layer colors for depth.
- Finish and protect your eggs for display.
- Clean up calmly.
Notes
Use food-safe dyes if you want the eggs to be edible. Painted hard-boiled eggs should not be eaten if they have been sealed with non-food-safe finishes.