

A sliver of afternoon light slides through my kitchen window and warms the rim of a small jar of glue. I press the nozzle gently and watch clear beads fall, pooling and catching the light like tiny glass moons. I breathe in the familiar, faint scent of school glue, feel its smooth, cool surface against the tip of a craft stick, and settle into slow, deliberate motions. Making DIY Glue Suncatchers invites this quiet attention, one soft movement at a time, and it turns ordinary light into a small, glowing calm.
Why DIY Glue Suncatchers Feels Comforting to Create

This craft asks for slow hands and patient watching. Each drop of glue becomes a little island of possibility, and as you fill shapes or trace lines you notice the hush that arrives when you work with clear, tactile materials.
I learned this while making a string of suncatchers with a friend on a rainy afternoon. We filled star shapes together, and our conversation slowed down to the rhythm of squeezing and waiting. The materials respond gently to touch: glue pulls smooth across plastic, pigment tints the clear like dawn through curtains, and the finished disks hold light in a new, tactile way.
Suncatchers bring small sensory pleasures. They offer the cool, smooth feel of dried glue under your fingertips. They shift the room when sun finds them, scattering colored flecks and soft shadows. They ask nothing grand from you. They reward patience with simple, shimmering quiet.
If you want more patterns and inspiration, you can explore a related project on Cozy Hands DIY that uses similar techniques and playful colorings to make translucent decorations: DIY Glue Suncatchers basics.
A Gentle Look at the Process
I recommend this project when you need to slow down but still want a hands-on result. You will draw, fill, wait, and peel. The steps feel like a small ritual: prepare, create, dry, and enjoy.
Your movements stay calm and rhythmic. Squeezing the glue bottle produces a soft, steady sound, and smoothing the surface with a damp fingertip gives a cool, satisfying tactile note. Waiting for the pieces to dry allows you to sit with the slow transformation of a glossy puddle into a glass-like disk.
This method blends simple chemistry and gentle craft. School glue dries transparent as the water evaporates and the polymer chains set, leaving a flexible, clear layer. Adding a touch of pigment or glitter changes how light bends through the finished piece. The process rewards attention more than speed.
If you liked the way bioplastic suncatchers handled translucency in another project, this companion guide offers more ways to play with color and light: colorful bioplastic suncatchers recipe.
Materials You’ll Need
- Clear school glue (PVA glue), 4–8 ounces, easy to find
- Disposable plastic lids or silicone molds, flexible and nonstick
- A thin plastic sheet or acetate, optional for tracing
- Food coloring or liquid watercolors, a few drops, optional and safe
- Fine glitter or mica powder, optional for shimmer
- Wooden craft sticks or toothpicks, for stirring and spreading
- A small funnel or syringe, helpful for precise filling (optional)
- Waxed paper or parchment, for drying surface
- String, fishing line, or thin ribbon, for hanging
- A craft knife or thin spatula, for gentle lifting once dry
- Small rubber gloves, if you prefer to avoid sticky fingers
- A well-ventilated, warm spot for drying, safe and out of reach of pets
Most of these items come from basic craft supplies. I use silicone molds because they release easily, and my hands notice their textured warmth as I press glue in. If you want a different look, try tracing shapes on acetate and building layers.
For another take on making translucent ornaments with different recipes, explore this further guide: bioplastic suncatchers variations.
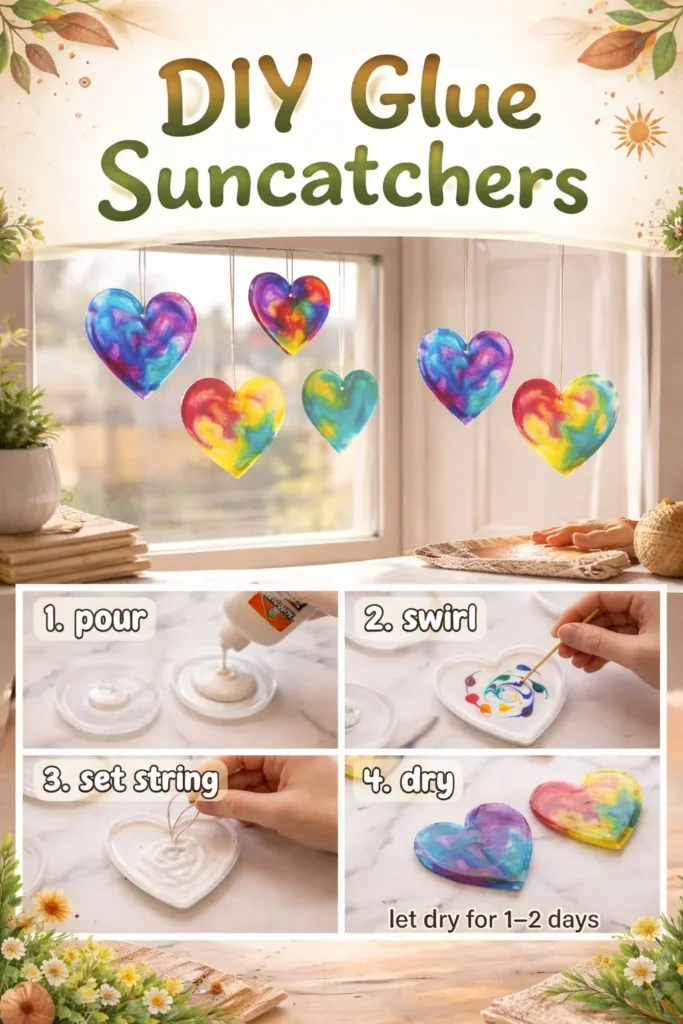
Step-by-Step Directions
- Prepare your workspace. Cover a table with waxed paper and set out molds, glue, and colorants. Breathe slowly, and notice the quiet click of supplies settling.
- Add a small puddle of glue to a clean lid or cup. Start with a tablespoon for a small suncatcher and adjust as you learn the thickness you like.
- Mix in color or glitter gently. A single drop of food coloring shifts the glue to a soft wash; stir with a wooden stick until even and calm.
- Fill the mold or shape on acetate. Pour slowly, letting glue find its level. Watch the surface smooth and catch the light as you move.
- Create textures if you like. Drag a toothpick through the wet glue to make waves, dots, or veins that will show when dry.
- Remove air bubbles. Tap the mold lightly on the table and let smaller bubbles rise and pop. This keeps surfaces clear and glass-like.
- Let pieces dry undisturbed. Place them in a warm, dry spot for 24 to 48 hours, depending on thickness. Check by gently touching the edge; it should feel firm and cool.
- Release gently from molds. Peel silicone molds back slowly, or lift acetate pieces with a craft knife. Move with steady hands to avoid bending.
- Punch or attach hanging loops. Use a small hole at the top, reinforce with a tiny dot of glue if needed, and thread your string.
- Finish with a soft cleaning. Wipe any rough edges with a damp cloth and place the suncatcher in light to test how it refracts and glows.
These steps honor the simple chemistry of PVA glue. When water evaporates, the polymer chains in the glue bond and form a flexible matrix. That matrix traps pigment and reflective particles in place, and it remains slightly flexible rather than snapping like glass, which makes these suncatchers forgiving in everyday use.
Enjoying the Finished Piece

{image_template}
A finished glue suncatcher changes the room in small, quiet ways. Hang one near a window and watch color spill onto the windowsill. Place a group at different heights and notice how the light moves through them throughout the day.
I often make a set of tiny disks and clip them to a thin dowel to form a lazy mobile. The mobile bends slowly when a breeze arrives, and the light jumps across the room like fragments of a remembered afternoon. Suncatchers also make gentle gifts. I wrapped a few in tissue paper and gave them to friends with a note about slowing down to notice light.
These pieces work well in a child-friendly space too. They sit safely near a window where kids can learn about color and shadow. The flexibility of dried glue makes them less likely to break than glass, and the tactile surface invites a careful touch.
If you enjoy exploring similar translucent projects that use safe kitchen-friendly materials, these ideas might inspire new shapes and textures: more bioplastic suncatchers techniques.
Caring for Your Finished DIY
Finished glue suncatchers last when you treat them with gentle care. They resist shattering but can scratch or bend if you press them too hard. Keep them out of direct heat near radiators or ovens, as excessive warmth can soften the glue over time.
To clean, wipe with a soft, damp cloth. Avoid harsh chemicals that might dull the surface. If a suncatcher develops a scratch, you can smooth it slightly with a very fine nail buffer or give it a delicate polish with a little mineral oil on a cotton cloth.
When you need to store them, stack pieces flat between sheets of tissue or waxed paper and place them in a shallow box. Store the box in a cool, dry place away from heavy pressure. Reusing suncatchers as part of seasonal displays works well: tuck them into a winter window grouping or hang a small constellation of disks in a herb garden window during summer.
I keep a slim wooden box by my craft shelf for a rotating selection of suncatchers. Pulling one out is like pulling a quiet memory into the light.
Small Ways to Make It Your Own
- Try layered colors. Pour a thin clear base, let it set, and add a contrasting top layer for depth. The layers create a soft, stained-glass effect.
- Add nature textures. Press tiny pressed flowers or leaf fragments into the wet glue. They sink slightly and make cloud-like inclusions as the glue dries.
- Work with stencils. Use simple paper stencils on acetate to build silhouettes moons, leaves, or little animals and fill around them for a framed effect.
- Use different shapes. I like shallow bowls for domed pieces and flat lids for disks. Each gives a different thickness and way the light bends through.
- Pair with embroidery thread. Tie thin, hand-dyed threads through hanging holes for a handmade loop that echoes the suncatcher colors.
These ideas invite gentle experimentation rather than perfection. Small changes create new textures and sounds, and testing them in low-stakes batches helps you trust what you like.
FAQs About DIY Glue Suncatchers
Will the glue stay clear over time?
Yes, clear PVA glue dries transparent. It can yellow slightly if exposed to direct, strong sunlight for long periods, so rotating suncatchers away from intense midday sun helps maintain clarity.
Are glue suncatchers safe for children?
They can be child-friendly if you supervise closely. Use non-toxic, school-grade glue and avoid tiny choking hazards like loose glitter with very young children. Keep drying pieces out of reach until fully set.
How do I avoid fingerprints and dust on the surface?
Work in a relatively clean area, and let pieces dry undisturbed. If dust lands on the wet surface, you can remove it with a gentle breath or a clean toothpick. Wearing thin gloves reduces fingerprints.
Can I hang them outside?
Short-term displays outdoors work in calm weather, but prolonged exposure to rain or heat can soften or degrade the glue. Bring them inside during bad weather and treat them like delicate textiles.
Can I repair a cracked or bent suncatcher?
Small bends often relax back into shape if you place the piece under a flat weight for a day. For cracks, a tiny dot of fresh glue smoothed into the seam can bond edges, but results vary. Keep expectations gentle this craft values small, handmade charm over machine-perfect durability.
Final Reflections on Making DIY Glue Suncatchers
I return to this craft when I want a slow, sensory task that rewards attention with light. The work invites patience: you make, you wait, and you watch how sunlight reshapes the ordinary. Each piece carries the warmth of your hands and the quiet of a few thoughtful minutes.
I trust the materials because they respond predictably. Glue will thin and level, pigment will spread quietly, and drying happens in its own time. That trust lets you relax into the process. If you find a moment of frustration, step back and breathe. The materials forgive a lot of human imperfectness.
Making suncatchers connects small motions to subtle change. You begin with a squeeze and end with a soft jewel of light. That loop the simple action and the steady reward makes the craft feel like a tiny ritual for presence.
Conclusion
I like to keep a small stack of ideas and references on hand for gentle inspiration. For a playful star-shaped option that works especially well with children, I often look at the glue star tutorial from Simple Fun for Kids, which shows a kid-friendly variation with bright shapes and easy steps: glue star suncatchers tutorial.
For a painted approach that layers color with glue for subtle depth, this painted glue suncatchers guide offers techniques to help you explore softer washes and detailed patterns: painted glue suncatchers technique.
Take the time to experiment with small batches, notice how each piece catches light, and enjoy the calm motions of making.
PrintDIY Glue Suncatchers

Create stunning DIY glue suncatchers that capture light and bring color into your home.
- Prep Time: 15 minutes
- Cook Time: 120 minutes
- Total Time: 135 minutes
- Yield: 4 suncatchers
- Category: Craft
- Method: Crafting
- Cuisine: N/A
- Diet: N/A
Ingredients
- Clear school glue (PVA glue), 4–8 ounces
- Disposable plastic lids or silicone molds
- A thin plastic sheet or acetate (optional)
- Food coloring or liquid watercolors (a few drops)
- Fine glitter or mica powder (optional)
- Wooden craft sticks or toothpicks
- A small funnel or syringe (optional)
- Waxed paper or parchment
- String, fishing line, or thin ribbon
- A craft knife or thin spatula
- Small rubber gloves (optional)
- A well-ventilated, warm spot for drying
Instructions
- Prepare your workspace. Cover a table with waxed paper and set out molds, glue, and colorants.
- Add a small puddle of glue to a clean lid or cup.
- Mix in color or glitter gently.
- Fill the mold or shape on acetate.
- Create textures if you like.
- Remove air bubbles.
- Let pieces dry undisturbed for 24 to 48 hours.
- Release gently from molds.
- Punch or attach hanging loops.
- Finish with a soft cleaning.
Notes
These suncatchers are flexible and forgiving, making them ideal for artistic exploration with various colors and textures.