

A small pile of eggshell halves sits on my table, thin and fragile like dried sea glass. I run my thumb along a curved rim, feeling the cool, papery texture and a faint chalky scent. I tell myself to slow down, to breathe with the soft weight of each shell. These Crystal Eggshells have a quiet way of asking for patience: a gentle wait while tiny mineral flowers grow, catching light and opening like frost on a window. If you have made small crystal projects before, you might notice the same calm focus as in my baking soda crystal tree project, where each growth asks for a slow hand and a kind gaze baking soda crystal tree project.
Why Crystal Eggshells Feels Comforting to Create

Making Crystal Eggshells asks you to move slowly, to set aside a little time and attention. You balance delicate halves in mason jars, pour warm, shimmering solution, and then wait as crystals bloom. The process offers a rhythm: prepare, suspend, rest, and notice.
I find the sensory parts especially soothing. The warm sip of the solution steam, the fine grain of mineral powder on fingertips, the moment you lower a shell and watch tiny beads form and gather. These moments invite presence. They ask you to watch small, patient changes rather than hurry toward a finished product.
This project also pairs well with other gentle experiments I enjoy. If you like watching crystals grow into trees or hearts, you may appreciate the quiet reward of coloring and shaping natural shells in the same slow way crystal-growing trees. The shells hold light, diffraction, and a hint of vulnerability. That sensory contrast — hard mineral inside fragile shell — creates a satisfying tension and a comforting end result.
A Gentle Look at the Process
You do not rush this work. First you prepare the shells and the workspace with calm motions. Then you make a warm, clear solution and color it if you wish. You secure each shell so it sits slightly tilted, letting gravity and the solution work with light.
You will hear small sounds: the soft pour of water, the click of a spoon against glass, the whisper of paper towel drying a rim. Over hours and nights you will notice a slow change. Crystals form first like dust, then gather into larger, faceted clusters. The visual rhythm feels like slow knitting: small parts linking into a whole.
This overview helps you know what to expect. It also keeps the process open enough for quiet experimentation. You can vary color, size, or the degree of roughness on the shell interior, and each choice changes the mood of the finished piece.
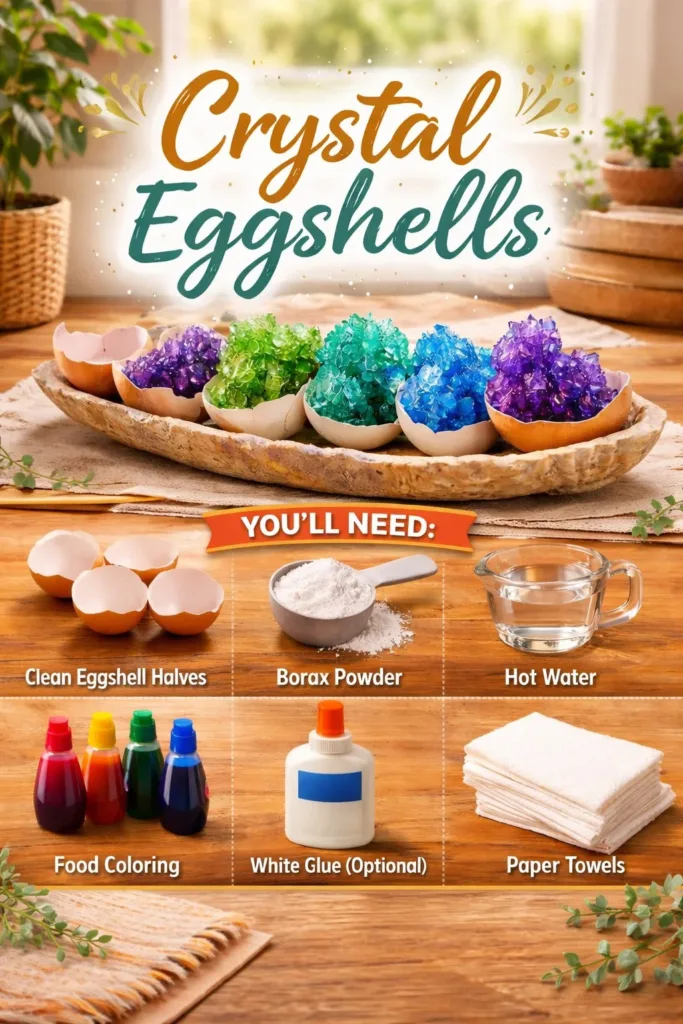
Materials You’ll Need
- Eggshell halves, cleaned and dry (save from breakfast; easy to prepare)
- Alum powder (potassium aluminum sulfate) or food-grade borax (both work; alum gives bright facets)
- Glass jars or small clear cups (one per eggshell half; easy to find)
- Hot water and a small saucepan (to dissolve the mineral)
- Food coloring (optional; a few drops create subtle hues)
- Thin wire, thread, or pipe cleaners (to suspend shells)
- Toothpicks or small clothespins (to hold suspension points)
- Small funnel or folded paper to pour solution gently (optional)
- Gloves and eye protection (recommended; keep chemicals off skin and away from eyes)
- Paper towels and a tray to catch drips (protects your table)
- Sandpaper or an emery board (optional; to roughen interior slightly and help crystals attach)
- A small seed crystal or spare alum crystals (optional; helpful if growth is slow)
I list alum and borax as options because both dissolve in warm water and form crystals as the solution cools. Alum tends to make brighter, glass-like crystals. Borax gives softer, snowflake-like clusters. Choose the one that matches how you want the surface to feel. If you use alum, buy it where pickling supplies or pharmacy products sell it. Always label and store mineral powders safely.
Step-by-Step Directions
Prepare your shells.
Gently tap and remove the egg contents, rinse the shells inside and out, and let dry fully.
If you like, bake them at low heat for 10 minutes to sterilize and make them crisp.Smooth or roughen where needed.
Run a soft emery board around the rim for comfort.
Lightly roughen the inside where you want crystals to grow; this gives them places to cling.Set up a cradle for each shell.
Bend a thin piece of wire or a pipe cleaner into a loop to hold the shell.
Balance the loop over a jar so the shell sits just above the opening, tilted slightly.Make a supersaturated solution.
Warm water in a small pot until it is hot but not boiling.
Stir in alum or borax a little at a time until no more dissolves and you see tiny undissolved grains.Color and cool a touch.
Add one or two drops of food coloring if you want color.
Let the solution sit for five minutes so it becomes clear and stops steaming.Pour the solution gently.
Use a small funnel or a folded paper to guide the liquid into each jar.
Fill so the shell interior is just submerged, but the rim stays dry.Suspend a seed or leave it plain.
Drop a tiny seed crystal into the shell or attach a small crystal to a thread and lower it inside.
This gives growth a starting point and often speeds the bloom.Find a calm place to wait.
Place jars on a tray in a spot with steady temperature and soft light.
Avoid drafts and sudden movement; crystals like gentle stillness.Watch and record gently.
Check after 12 hours, then at 24 and 48 hours.
You will see small beads become clusters, then clear facets; photograph or note changes for quiet delight.Finish and dry.
When growth feels full, remove shells carefully by lifting the support.
Drain excess solution back into the jar, then let shells dry on a towel until they feel stable.Seal if you want.
If you plan to touch them often, consider brushing a thin clear sealant on the outer edges only.
This step keeps tiny crystals from shedding while preserving their sparkle.Clean up safely.
Dispose of leftover solution responsibly; do not pour large amounts down drains without dilution.
Wash jars and tools with warm soapy water, and store powders out of reach.
Bringing Crystal Eggshells Into Your Space


Crystal Eggshells carry a gentle, natural elegance. I like to set one in a small bowl filled with soft moss, so the shell sits like a little geode in a cool nest. The moss muffles sound and makes the piece feel like part of a tiny landscape.
You can cluster several shells on a narrow wooden tray and place them on a windowsill. Morning light catches the facets and scatters tiny rainbows across the wood. The effect is quiet and warming. For a bedside table, keep a single shell under a soft lamp. The slow sparkle reads as peace rather than display.
If you enjoy seasonal touches, tuck shells into a wreath or among dried branches for a subtle mineral accent. Be mindful of fragile edges; place shells where they will not be knocked. I have also set shells in a shallow glass dome for a little mineral terrarium. That keeps dust off and invites long, undisturbed viewing.
You can pair your shells with other slow-making pieces. I often place them alongside a small crystal tree or a delicate baking-soda heart as a tactile grouping baking soda crystal heart. The contrast between the hard mineral centers and soft supporting textures creates a cozy composition.
How to Store or Reuse Crystal Eggshells
When you need to store them, place shells in a shallow box lined with acid-free tissue or cotton batting.
Wrap each shell gently to protect edges and prevent rubbing.
If a shell sheds small crystals over time, keep it in a closed glass container or dome to reduce dust and contact.
A glass cloche gives you the view without the risk.
You can reuse the solution to start another small growth experiment if it still contains dissolved mineral.
Warm it again and add more alum or borax to reach saturation, then try another shell.
For long-term care, avoid places with high humidity or direct sunlight that could fade color over many months.
Check shells occasionally for dust and use a soft brush to clear loose grains.
If crystals flake or you wish to refresh the look, gently rinse the shell and start again with a fresh solution.
Some of my favorite results came from a second, slower growth phase that layered new crystals over old ones.
Gentle Tips & Variations
Invite color slowly.
Add tiny amounts of food coloring to the solution. Start with one drop for a soft tint. Strong color can obscure clear facets.Use a seed crystal for faster bloom.
Grow a small alum crystal on a toothpick first, then transfer it to the shell. It speeds growth and gives a star-like center.Try different minerals.
If alum makes very sharp facets and you prefer softer clusters, experiment with borax in warm water for a snowier look.Play with tilt and depth.
Adjust how deep the shell sits in the jar. A steeper tilt creates longer, one-sided drifts of crystals. A shallow placement makes a gentle spread.Pair with texture.
Set crystals on contrasting surfaces like rough wood or velvet. The tactile difference makes the mineral facets feel more precious.
These ideas are invitations, not rules. I often mix approaches depending on the mood of the afternoon. Sometimes a quick seed crystal gives a dramatic result. Other times I let growth happen without intervention and savor the surprises.
FAQs About Crystal Eggshells
Q: Are these safe to make at home?
A: Yes, with caution. Use gloves and avoid ingesting materials. Keep powders and solutions away from children and pets. Work in a well-ventilated space and label any stored powders clearly.
Q: What happens if my crystals do not form?
A: Crystals need a supersaturated solution and steady conditions. If growth is sparse, try adding more mineral powder to the warm solution, roughening the interior slightly, or using a seed crystal. Patience also helps; some crystals form slowly over several days.
Q: Can I use real eggshells from the kitchen?
A: Absolutely. Clean them well, dry completely, and consider baking them briefly to sterilize. The natural curve and thinness of kitchen shells make them perfect canvases.
Q: How long do the crystals last?
A: With careful handling and a protected display, they can last for years. Keep them in low-humidity, low-traffic spots and consider a glass dome for fragile pieces.
Q: Can children help with this project?
A: Children can enjoy parts of the project, such as rinsing shells and watching growth, under close adult supervision. Let adults handle boiling and dissolving steps. Emphasize that the materials are not food.
A Gentle Note Before You Go
When I craft with Crystal Eggshells, I think of slow afternoons and the steady promise of small change. Growth happens whether I rush or not, but the best results come from a gentle pace. Treat each shell like a tiny patient companion. Move softly, breathe deeply, and let the quiet bloom.
If you feel unsure, start with one shell and simple steps. Celebrate small successes, and remember that imperfect growth has its own beauty. The cracks, the uneven clusters, the areas left bare all tell a story of the making process. Keep your workspace warm and tidy, enjoy the sensory moments, and let the crystals teach you to wait.
Conclusion
If you want a more stepwise laboratory-style method for making egg geodes, the Instructables guide offers detailed photos and measurements: How to Make Crystal Egg Geodes – Instructables.
For a clear science-focused walkthrough that explains the chemistry of crystal formation inside eggshells, see this beginner-friendly explanation: How to Make Crystal Eggshell Geode Chemistry Science Experiment.
PrintCrystal Eggshells

Create beautiful crystal formations inside eggshells using a slow and gentle process, perfect for those who appreciate delicate crafts.
- Prep Time: 10 minutes
- Cook Time: 480 minutes
- Total Time: 490 minutes
- Yield: Multiple eggshells
- Category: Crafts
- Method: Crafting
- Cuisine: N/A
- Diet: N/A
Ingredients
- Eggshell halves, cleaned and dry
- Alum powder or food-grade borax
- Glass jars or small clear cups
- Hot water
- Food coloring (optional)
- Thin wire, thread, or pipe cleaners
- Toothpicks or small clothespins
- Small funnel or folded paper
- Gloves and eye protection
- Paper towels
- Sandpaper or an emery board (optional)
- A small seed crystal or spare alum crystals (optional)
Instructions
- Prepare your shells by gently tapping and removing the egg contents, rinsing, and drying them fully.
- Smooth or roughen the desired areas on the shells for crystal growth.
- Set up a cradle for each shell using wire or pipe cleaners.
- Make a supersaturated solution by warming water and dissolving alum or borax.
- Color and let the solution cool a bit if desired.
- Pour the solution gently into each jar to submerge the shell interior.
- Suspend a seed crystal or leave the shell plain.
- Find a calm place to let the crystals grow in soft light.
- Watch and record the growth at intervals.
- Finish the process by removing shells carefully and drying them.
- Seal if necessary for preservation.
- Clean up safely after the project.
Notes
Use gloves and eye protection when handling chemicals. Store any leftover solution safely and with care.