

A warm slant of afternoon light rests on my work table as I press a bead into a pool of clear glue. The glue catches the light like glass, but it yields under my fingertip and holds the bead with a gentle, quiet strength. Making a Clear Glue Mosaic Suncatcher feels like collecting small moments of calm and holding them between two panes of light.
The Quiet Joy of Making Clear Glue Mosaic Suncatcher

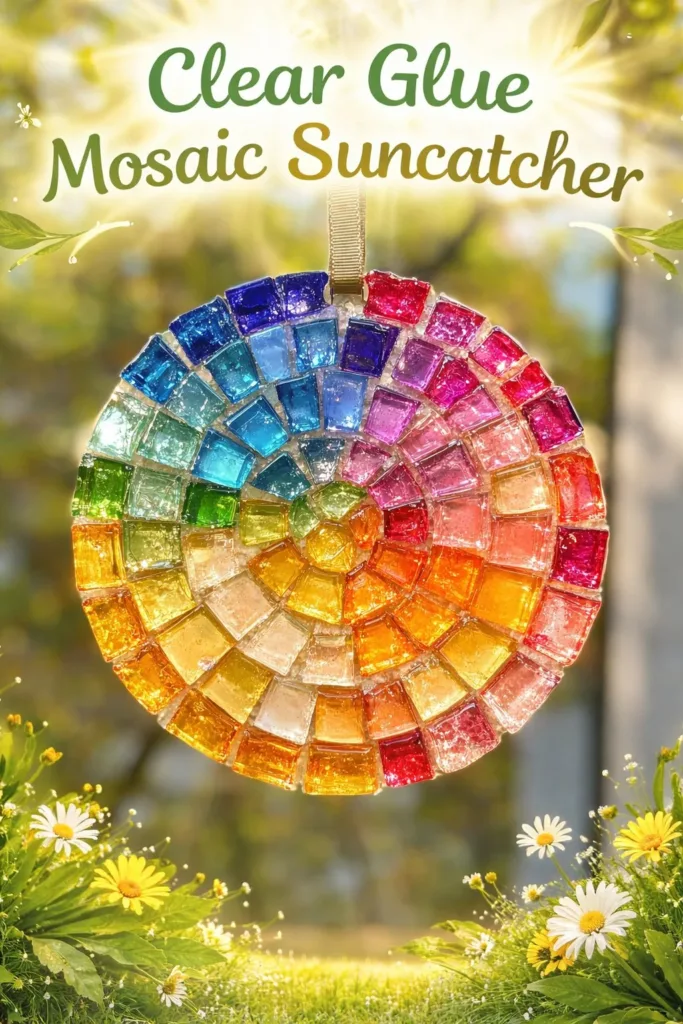
There is something humble and tender about this project. You work with soft, familiar materials and slow movements. Each small piece becomes part of a whole that captures the day when the sun moves through your window.
This craft asks you to pay attention to texture and tone. You notice the gloss of glue as it smooths, the whisper of beads against resin, and the gradual change as the sun pulls color through your design. Those moments help you slow down, breathe, and feel present.
I often return to similar projects when I want a gentle ritual. If you love the way hot light and handwork meet, you might also enjoy making other suncatchers like my simple valentine heart suncatchers, which use the same clear-glue magic in a different shape.
A Gentle Look at the Process
Before you start, imagine the rhythm. You trace a small outline, drop a puddle of clear glue, and set a bead or a shard. You pause. You press gently. You move on. The process repeats with a slow, meditative cadence.
You work mostly with your hands. You will feel the tack of glue, the smooth edge of a glass gem, and the tiny resistance as each piece settles. You will hear soft clicks and a faint scraping when tools meet materials. Those little sounds become a comforting soundtrack.
This project asks for patience more than speed. You let glue dry in thin layers and return later to add depth. You watch the finished piece change as it cures. If you liked the tactile approach of projects such as the layered color in the blue crayon suncatchers, you will find similar quiet rewards here.
Materials You’ll Need
- Clear craft glue (thick or gel finish; easy to find)
- Clear plastic sheet or thin acetate (sturdy base)
- Small glass beads, flat marbles, or glass gems (assorted colors)
- Transparent craft gems or acrylic shapes (optional, for variety)
- Craft sticks or palette knife (for spreading glue)
- Trim scissors (for cutting plastic)
- Wax paper or nonstick craft mat (protects surfaces)
- Fine-tip squeeze bottle or pipette (optional for precise glue drops)
- Small mixing tray or disposable plate (to hold glue)
- Lightweight string or clear fishing line (for hanging)
- Small hole punch or heated needle (to make a hanging hole)
- Paper towels and a damp cloth (for gentle cleanup)
- Protective gloves (optional, for sensitive skin)
I like to keep extras nearby: a spare bead here, an extra sheet of acetate there. You can swap materials freely. For a softer look, use translucent acrylic gems. For brighter shine, use glass. If you tried bioplastic suncatchers before, like the recipes in my posts about colorful bioplastic suncatchers or the alternate bioplastic method, you will notice how different materials change the way light moves through your piece.
Step-by-Step Directions
-
Prepare your workspace and base.
Lay wax paper on the table and place the acetate sheet flat.
Keep a small tray of glue and your gems within easy reach. -
Plan a loose design with a calm hand.
Scatter beads over the acetate until you like the rhythm of color.
Breathe and move slowly as you decide where the first bead will sit. -
Place a small glue puddle where the first piece will go.
Use a craft stick or a squeeze bottle for a steady drop.
Aim for a shallow mound that will spread slightly under the piece. -
Set a glass gem into the glue.
Press gently until the glue spreads under the edge and holds.
You should feel a soft give as the gem finds its place. -
Continue adding pieces with mindful pacing.
Work in small areas so glue does not run together too much.
Leave tiny gaps if you like a mosaic effect or crowd pieces for a denser look. -
Use thin lines of glue to connect pieces if needed.
A fine-tip bottle lets you draw delicate paths of glue.
These connections help hold smaller bits in place without overwhelming the light. -
Let the first layer set until it feels tacky but not wet.
This dry time varies with glue brand and room temperature.
Touch lightly to sense when the glue supports new layers. -
Add depth with a second layer or small clear beads.
Place the second layer with quieter motions and smaller pieces.
That layering creates shadows and little pools of light. -
Create a hanging point once the glue holds firm.
Punch a tiny hole in a corner of the acetate or warm a needle and melt a hole carefully.
Thread a short length of string or fishing line through and knot it gently. -
Allow the entire suncatcher to cure fully in a flat, dust-free space.
Cure times vary; expect at least 24 hours for most gel glues.
Avoid moving it until the glue feels hard and secure. -
Final clean and gentle buff.
Wipe edges with a damp cloth to remove stray glue.
Trim any ragged acetate edges with clean cuts for a soft finish. -
Display and breathe.
Hang the suncatcher in a window that catches a slow shift of light.
Sit nearby, notice small changes, and let the work make a quiet place in your day.
Enjoying the Finished Piece


Place your suncatcher where light moves across it during the day. Morning light will feel cool and delicate. Late afternoon light will warm the colors and make small glints along the edges.
You can keep a suncatcher in a kitchen window, near a reading nook, or above a small bedside shelf. Each location gives you a different mood. The same piece can feel like a fresh, bright jewel in one window and a soft, calm blot of color in another.
Try rotating the suncatcher slowly when the sun changes. Notice how details you did not expect become vivid. Those shifting views extend the quiet pleasure of making and help the piece feel alive in your home. If you collect small handmade light pieces, the suncatcher will fit among them, adding a translucent, tactile note.
Making This DIY Last
Store hung pieces out of direct rain or wind. Keep them away from sharp temperature swings. Extreme heat can soften glue and very cold may make it brittle, so choose a stable spot.
If a piece loosens, mend it with a small dot of the same clear glue and press pieces back into place. Work gently and allow a full cure before rehanging. For long-term care, dust with a soft brush rather than harsh chemicals.
When you pack away a suncatcher, nest it flat between layers of tissue paper. Keep beads and small extras in a labeled jar so you can rebuild or modify pieces later. Thoughtful storage helps these delicate, sun-capturing pieces last for seasons.
Gentle Tips & Variations
- Invite texture quietly: tuck tiny fabric scraps or translucent paper under clear beads to make soft color shifts.
- Try layered depth: build three shallow layers rather than one thick one for a more dimensional piece.
- Use a frame: cut acetate into a gentle circle or leaf shape and add a thin wooden frame around the edge for a finished look.
- Play with scale: make a small suncatcher for a tight spot or create a larger one to become a focal light in a room.
- Make it portable: attach a small clip to the top so you can move the suncatcher between rooms or take it outdoors on calm days.
Treat these ideas as invitations. You can mix and match them slowly and see how each change alters the way light and handwork can calm you.
FAQs About Clear Glue Mosaic Suncatcher
Q: Will the clear glue yellow over time?
A: Some glues tend to yellow if they contain certain additives or if they sit in very warm, direct sun for long periods. I choose a high-quality clear gel glue and keep the piece out of intense heat to reduce this change. If you want extra longevity, look for glues labeled non-yellowing or UV resistant.
Q: Can children help make this project?
A: Yes, children can help, and the project suits gentle supervision. Give little hands pre-arranged beads and supervise glue placement to keep things neat and safe. I recommend gloves if you worry about sticky fingers and choose non-toxic glue.
Q: What if my beads shift while the glue dries?
A: If a bead shifts before the glue firms, gently nudge it back in place with a craft stick. Work slowly and anchor key pieces first, then fill in around them. If a bead moves after the glue feels dry, add a small fresh dot of glue to re-secure it.
Q: Can I use real glass shards?
A: You can use glass shards if you handle them carefully and file or tape sharp edges. I prefer smooth glass gems for safety and ease. If you do choose shards, wear gloves and take extra care with storage and display.
Q: How do I make a hanging hole without cracking the acetate?
A: Warm a sewing needle over a candle and press it gently through in a low-pressure spot. Work slowly and keep the needle steady so the heat melts a neat hole instead of forcing a crack. Let the area cool before threading string.
A Quiet Closing Thought
Sit with your finished suncatcher for a moment. Watch a single patch of light move across the beads and notice the tiny changes in color and shadow. The piece holds a simple record of your touch, a small calm you can return to again and again. Let the making remain as meaningful as the object itself; let each small act of placement and pause become a gentle ceremony.
Conclusion
If you want a step-by-step approach that showcases colorful arrangements with glue, see the detailed tutorial at Mombrite’s glue suncatcher tutorial, which inspired many simple layout ideas that pair well with the mosaic method described here. For a thoughtful exploration of mosaic techniques and child-friendly suncatcher ideas, the guide at Glittering Shards’ mosaic suncatcher guide offers gentle, hands-on tips and design inspiration.
PrintClear Glue Mosaic Suncatcher

Create a beautiful suncatcher using clear glue and assorted beads to bring a splash of color to your window.
- Prep Time: 15 minutes
- Cook Time: 1440 minutes
- Total Time: 1455 minutes
- Yield: 1 suncatcher
- Category: Craft
- Method: DIY Crafting
- Diet: None
Ingredients
- Clear craft glue (thick or gel finish)
- Clear plastic sheet or thin acetate
- Small glass beads, flat marbles, or glass gems (assorted colors)
- Transparent craft gems or acrylic shapes (optional)
- Craft sticks or palette knife (for spreading glue)
- Trim scissors (for cutting plastic)
- Wax paper or nonstick craft mat
- Fine-tip squeeze bottle or pipette (optional)
- Small mixing tray or disposable plate
- Lightweight string or clear fishing line (for hanging)
- Small hole punch or heated needle (to make a hanging hole)
- Paper towels and a damp cloth (for gentle cleanup)
- Protective gloves (optional)
Instructions
- Prepare your workspace and base by laying wax paper on the table and placing the acetate sheet flat.
- Plan a loose design by scattering beads over the acetate until satisfied with the color rhythm.
- Place a small glue puddle where the first piece will go using a craft stick or squeeze bottle for a steady drop.
- Set a glass gem into the puddle and press gently until it feels secure.
- Continue adding pieces mindfully, leaving gaps for a mosaic effect if desired.
- Use thin lines of glue to connect smaller pieces if necessary.
- Let the first layer set until tacky but not wet.
- Add a second layer or small clear beads for depth.
- Create a hanging point by punching a tiny hole or melting a hole carefully in one corner.
- Allow the entire suncatcher to cure fully in a dust-free space for at least 24 hours.
- Final clean by trimming any ragged edges and wiping excess glue.
- Display the suncatcher in a window and enjoy the shifting light through it.
Notes
Consider using transparent acrylic gems for a softer look or glass for a brighter shine. Be mindful of handling glass shards carefully if used.