

I set a small jar of cool, pearly bioplastic by the window and watch the light find the thin edges. The surface catches the sun like a quiet memory, and I trace the soft ripple with my eyes. Making DIY Bioplastic Suncatchers lets my hands slow down. The warm kitchen air, the faint scent of cooked starch, and the gentle clink of a spoon all fold into a calm, steady rhythm.
I often share a relaxed version of this project in my cozy corner, and you can find a colorful take in one of my posts about a similar recipe that brightened a rainy afternoon here.
The Quiet Joy of Making DIY Bioplastic Suncatchers

There is something small and sacred about catching light. A suncatcher stops the day, just for a moment, and invites you to notice color and texture. The act of stirring the bioplastic mixture feels like kneading a soft clay. Your fingertips learn its mood. That slow, tactile work helps you breathe more fully.
I make these suncatchers when I need a gentle break. The sounds in my kitchen grow soft. The spoon slides, a thin steam ribbon lifts, and the mixture becomes glossy and smooth. You notice tiny changes: a slight thickening, the way color pools, or the way air bubbles pop and leave a tiny crater. These small moments help you clear your mind and focus on touch and sight.
Making a suncatcher also connects you to simple materials. You work with elements that are familiar and kinder than many plastic crafts. If you want more notes on eco ideas and the gentle choices behind them, I have another piece that explores the environmental side of this craft that you might like here.
A Gentle Look at the Process
Before you begin, imagine a slow rhythm: heat, stir, pour, press, and set. The process asks for small, repeated motions and a few patient waits. Those waits are part of the calm. They let the material settle and let you breathe.
You stir until the liquid thickens like a thin pudding. You pour into a shallow mold and then pick up tiny leaves or pressed flowers to tuck into the surface. The bioplastic feels warm and soft at first, then cool and firm as it rests. The steps flow in a sequence that invites a measured pace, not a rush.
If you want a slightly different approach to the same idea, there is another tutorial that adds botanical details and a slower drying method that I return to sometimes here.
Materials You’ll Need
- Tapioca starch or corn starch (easy to find)
- White vinegar or apple cider vinegar (small amount)
- Glycerin (keeps the bioplastic flexible; optional but helpful)
- Distilled water (clean and neutral)
- Food coloring or natural pigments (optional)
- Small silicone molds or a flat glass tray (for shaping)
- A heatproof bowl and a small saucepan (for gentle cooking)
- A wooden spoon or silicone spatula (smooth on hands)
- Parchment paper (for drying and releasing)
- Small leaves, pressed flowers, or translucent bits for decoration (optional)
- A hole punch or needle for hanging once set
- Scissors and thin thread or ribbon for display
Note on materials: glycerin makes the finished piece softer and less brittle. You can skip it if you prefer a firmer, more brittle finish. I like to keep a small jar of dried edible flowers for pressing; they add a quiet, natural look. If you prefer vegan-certified products, check labels. I often choose simple pantry items to keep the process gentle and familiar.
Step-by-Step Directions
- Measure gently and gather your tools.
Stirring feels calmer when everything sits ready. Place a saucepan on low heat. - Combine starch and water in the heatproof bowl.
Whisk until smooth and no lumps remain. The texture should feel silky. - Heat the mixture slowly, stirring often.
The mix will thicken. Listen for a soft simmer and watch the gloss form. - Add vinegar and a small splash of glycerin.
Stir in color if you like. The glycerin keeps the finished sheet slightly soft. - Cook until the paste clings to the spoon.
You will see it pull away from the pan in a soft ribbon. That is the right moment. - Pour onto parchment on a flat tray while warm.
Smooth with the back of a spoon for an even layer. Work with calm, even motions. - Press small botanicals into the warm surface.
Tuck edges gently so they rest flat. They will float on top as the sheet cools. - Allow to cool and set for several hours.
A patient wait helps the material firm slowly and evenly. Check for tackiness. - Peel the film carefully from the paper.
If it resists, let it rest longer. The surface should lift with a slight pull. - Cut shapes and make a hole for hanging.
Use scissors to trim soft edges. A small hole near the top holds a ribbon.
These steps match how I work in my kitchen most afternoons. The mixture behaves like a soft dough when warm and becomes like a thin, translucent sheet when it cools. If it feels too brittle, a touch more glycerin next time softens it. If it feels too soft, reduce glycerin or cook a little longer for firmer results.
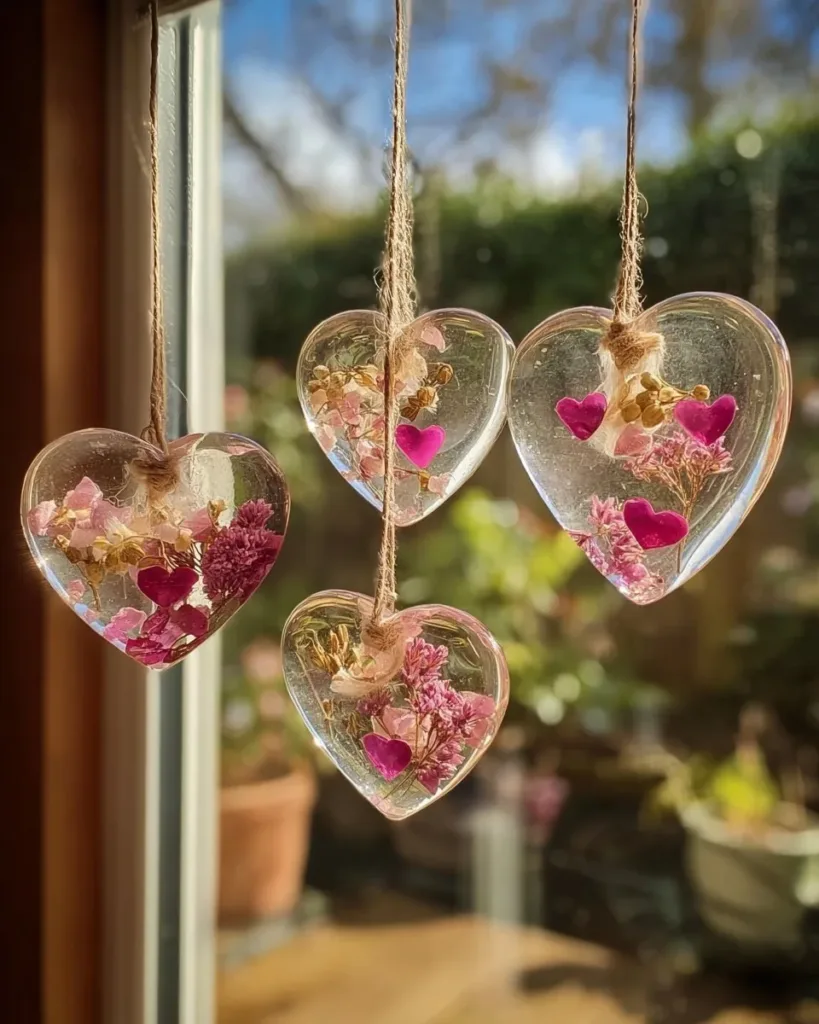
Bringing DIY Bioplastic Suncatchers Into Your Space

When a suncatcher hangs in a window, it changes the room. The light becomes patterned and soft. I like to hang a single piece near a reading chair so the sun gives a gentle, moving glow as the day passes. A cluster of small suncatchers looks like captured moments of light.
You can use a single suncatcher as a gift tag on a wrapped present. I let the package sit by the window for a day so the new piece settles into its form before tying it to a ribbon. It adds a handmade, quiet charm.
If you plan to display them outdoors, place them in a sheltered spot. Direct strong sun for long stretches can sometimes cause softer bioplastic to lose shape. Indoors, they last longer and the gentle filtering of light makes them feel like part of your everyday calm.
I keep a small list of living habits that help these pieces feel at home and unhurried. For notes on eco-friendly choices around making and showing these pieces, you may find this companion article helpful here.
Making This DIY Last
Bioplastic suncatchers last best when you treat them like delicate craftwork. Store them flat in a cool, dry place away from direct sun when you are not using them. A shallow box lined with tissue paper works well.

Avoid folding or creasing the finished pieces. If they bend slightly, lay them on a flat surface and let them settle overnight. Warmth can relax the material, so keep them out of hot cars or heaters.
If a piece picks up dust, wipe it gently with a soft, damp cloth. Do not scrub. For stubborn marks, use distilled water and a light touch. Never soak them for long periods.
If a suncatcher cracks, you can mend it with a small dab of fresh bioplastic made from the same recipe. Use a tiny bit like glue and press the pieces together until they set. This repair keeps the feeling of care and slows down the throwaway impulse.
What I’ve Learned While Making This
I learned to enjoy the pauses more than the finish. Waiting for the sheet to cool lets me sip tea, breathe, and notice small things around me. The quality changes are subtle and satisfying.
I also learned that imperfections give each suncatcher character. Tiny bubbles make the sun dance in small new ways. A slightly uneven edge catches light differently. I keep a basket of “practice” pieces that feel perfectly cozy to me, even if they do not sit in a window.
Experimenting with small amounts of color taught me a gentle lesson. Less often reads better in the glass of a window. A single dab of pigment spreads in a soft veil. If you want brighter color, layer thin washes and allow each layer to dry.
Safety note from experience: the cooking stage is warm, and the mixture can be hot to the touch. I always use a sturdy pot, keep a cloth handy, and hold my hands a safe distance from steam. I work slowly and let the mixture cool a little before handling. These small habits keep the making calm and safe.
Try a touch of scent on a corner strip of paper placed nearby while you make. A faint cup of herbal tea in the room makes the whole process feel like a small ritual.
Gentle Tips & Variations
- Invite texture with pressed fabric scraps.
Tuck a tiny strip of linen into the warm surface for a soft, woven shadow. - Use natural pigments and tea dyes.
Brew strong tea or use beet juice for a muted, earthy color. Test a small patch first. - Make layered suncatchers.
Pour a thin base, let it set, then press in extras and cover with a thin top layer for depth. - Add a loop of copper wire for a modern touch.
Bend a delicate loop and press its ends just into the cooling sheet so it holds without piercing too deeply. - Try imprinting patterns with a leaf or lace while the surface stays warm.
Press and lift slowly to keep the pattern crisp and poetic.
Each tip feels like a little invitation to play and not a rule to follow. I learned to treat these ideas as gentle experiments. Some work beautifully. Some give a pleasing surprise.
FAQs About DIY Bioplastic Suncatchers
Are these suncatchers safe to make with children?
Yes, with supervision. The cooking step is hot, so an adult should handle that part. Children can press botanicals and trim once pieces cool. The hands-on parts are great for sensory play.
How long do they keep their color?
Colors fade slowly in bright, direct sun. Indoors, they hold color longer. Using light, muted pigments helps the pieces age gracefully.
Can I hang them outside?
You can, but keep them out of harsh weather and direct, all-day sun. A covered porch works well. Indoors they last longer.
What if my finished piece feels brittle?
That means it cooked a bit long or had little glycerin. Next time cook a touch less or add a few drops more glycerin for flexibility.
Are these biodegradable?
They are made from starch-based materials and will break down faster than many plastics under the right conditions. Treat them like handmade art that deserves gentle care.
A Gentle Note Before You Go
When you finish a suncatcher, take a quiet minute to place it in a window and watch how it shifts with the day. Notice the soft changes in color and the way the afternoon light moves across the wall. Making this kind of object is not only about the result. It is about the small, steady acts that help you slow down and feel present.
Keep a few of your early pieces nearby as reminders that skill grows through practice, not speed. If a piece turns out different from what you imagined, set it aside. Sometimes a small surprise becomes your favorite.
Conclusion
I like to keep a short list of gentle references when I want to return to this craft or explore small variations. If you enjoy a clear, step-by-step explanation of the basic science and method behind bioplastic suncatchers, this practical guide offers a friendly walkthrough: How To Make A Bioplastic Suncatcher – Chemistry for Kids. For inspiration that leans into botanical design and layering techniques, this lovely project shows how to weave nature into your suncatchers: Botanical Bioplastic Sun Catchers – Wineberry Woods.
If you want to explore more ideas from this cozy space, you might find the other posts on my site useful as you grow your practice. Thank you for letting your hands slow down with this project. I hope the soft light you make finds a warm place in your home.
PrintDIY Bioplastic Suncatchers

A gentle and creative project for making bioplastic suncatchers that catch the light and add charm to any window.
- Prep Time: 10 minutes
- Cook Time: 15 minutes
- Total Time: 25 minutes
- Yield: Varies depending on mold size
- Category: Craft
- Method: Crafting
- Cuisine: N/A
- Diet: N/A
Ingredients
- Tapioca starch or corn starch
- White vinegar or apple cider vinegar
- Glycerin (optional but helpful)
- Distilled water
- Food coloring or natural pigments (optional)
- Small silicone molds or a flat glass tray
- A heatproof bowl and a small saucepan
- A wooden spoon or silicone spatula
- Parchment paper
- Small leaves, pressed flowers, or translucent bits (optional)
- A hole punch or needle
- Scissors and thin thread or ribbon
Instructions
- Gather your materials and tools.
- Combine starch and water in a heatproof bowl and whisk until smooth.
- Heat the mixture slowly, stirring often until it thickens.
- Add vinegar and a splash of glycerin; optionally stir in food coloring.
- Cook until the paste clings to the spoon.
- Pour the mixture onto parchment on a flat tray while warm.
- Press small botanicals into the surface gently.
- Allow to cool and set for several hours.
- Peel the film carefully from the paper.
- Cut shapes and make a hole for hanging.
Notes
Glycerin keeps the bioplastic flexible; you can skip it for a firmer finish. Store suncatchers flat in a cool, dry place away from direct sunlight.