

A warm afternoon light slips through the window and pools on the table where a scatter of blue wax bits waits. I press my thumb along a softened crayon and feel the smooth warmth, hear the faint scratch of paper curling as I shave a sliver. Blue Crayon Suncatchers invite that slow, small attention. They ask for careful hands, a gentle rhythm, and a moment to simply watch color bloom in the sun. If you have a quiet corner and a few crayons, this project will sit with you as a soft, luminous companion.
I first made a set of these on a rainy morning, listening to the steady tap of droplets and lighting a candle for company. The process felt like stitching light into colored glass, and the finished suncatchers offered a calm, unhurried joy. For another color idea, you might enjoy the DIY Blue Crayon Suncatchers tutorial that inspired this gentle approach.
Why Blue Crayon Suncatchers Feels Comforting to Create

Working with blue takes me to quiet places. The color itself soothes the eye. It slows the breath. Blue sits comfortably between the coolness of the morning and the hush of dusk. When you melt and press crayon wax, you feel a tactile warmth that is both immediate and kind.
This craft asks for small, repetitive movements. You grate crayons, drop bits into a mold, and watch light move through the softened wax. Those repeated gestures bring a simple focus. The sound of a peeler against wax, the faint scent of warmed color, and the soft glow at the edge of a suncatcher add gentle sensory cues that calm a busy mind.
I find that making this piece supports a slower day. It pairs well with a cup of tea and quiet music. If you enjoy exploring other calm, color-based crafts, try the green crayon raindrop suncatchers for a different mood and rhythm.
A Gentle Look at the Process
Before you start, imagine the rhythm. You will sort colors, shave crayon, arrange bits, melt gently, and pull a finished piece into light. Each action moves slowly and deliberately. You might arrange shades of blue from pale sky to deep navy, watching how they sit next to each other on the tray.
Expect small changes in texture. Crayon shavings feel papery at first and then smooth to a soft, waxy sheen. The sound of metal on wax is crisp and comforting. When you pop a cooled suncatcher from its mold, the edges feel warm at first and then firm under your fingers. Savor that first soft bend. It tells you the piece made its own quiet transition from loose color to held light.
Materials You’ll Need
- Blue crayons, assorted shades (easy to find; old crayons work beautifully)
- A vegetable peeler or crayon sharpener (simple tool; gentle on your hands)
- Parchment paper or silicone baking mat (prevents sticking; optional but helpful)
- Heat-safe silicone molds or a firm spacer ring (silicone is forgiving; choose shapes you love)
- A cookie sheet or oven-safe tray (to contain the heat)
- Oven or small toaster oven set to low temperature (control the heat gently)
- Hole punch or small metal skewer for making a hanging hole (optional)
- Ribbon, string, or clear fishing line for hanging (subtle and light)
- Small paintbrush or toothpick for easing edges (useful for smoothing)
- A window with steady light for display (no direct, intense heat)
- A shallow bowl of cool water and a drying cloth (for quick, gentle cleanups)
Materials matter because they shape the experience. Silicone molds flex and release, which reduces the need to force anything out. Parchment paper keeps clean lines and limits washing. Using old crayons gives color a lived-in softness that new crayons sometimes lack. I like to gather a little kit in a shallow tray so everything feels within easy reach.
Step-by-Step Directions

- Preheat your oven to a low temperature, around 250 degrees Fahrenheit.
Place the tray with molding area in a calm, well-ventilated spot.
Gather your crayon pieces and tools so you do not rush. - Remove paper wrappers from crayons and sort shades of blue.
Use a peeler to shave gentle curls or small shards of wax.
Notice the change in texture and the faint wax scent as you work. - Arrange a single layer of shavings in the silicone mold.
Mix light and dark blues with a soft eye toward balance.
Leave a little space so light can pass through the finished piece. - Cover the mold with a sheet of parchment paper for protection.
Slide the mold onto the tray and place it in the oven.
Watch for the wax to soften and gleam, not bubble. - Remove the tray carefully when the wax has melted into a smooth pool.
The color will deepen and the surface will shine.
Work slowly and use a heat-safe glove if needed. - If you want a marbled look, tilt the tray slightly and let colors swirl.
Use a toothpick or small brush to nudge patterns with a light touch.
Avoid overworking; a few gentle movements are enough. - Allow the wax to cool partially, so it firms but stays pliable.
If you plan a hole for hanging, press a skewer gently where you want it.
Do this before it hardens completely, so the hole forms cleanly. - Once cool and firm, flex the silicone mold to release the suncatcher.
Place the piece on parchment to finish cooling to room temperature.
Run a soft cloth over edges if they feel rough. - Thread ribbon or fishing line through the hole and tie a neat knot.
Hold the suncatcher up to light and adjust the length for hanging.
Take a deep breath and admire the color as it catches the sun. - Clean up your space with the bowl of cool water and a cloth.
Wipe tools while they are still warm for easier cleaning.
Store leftover shavings for another day; they make small, ready palettes.
Enjoying the Finished Piece

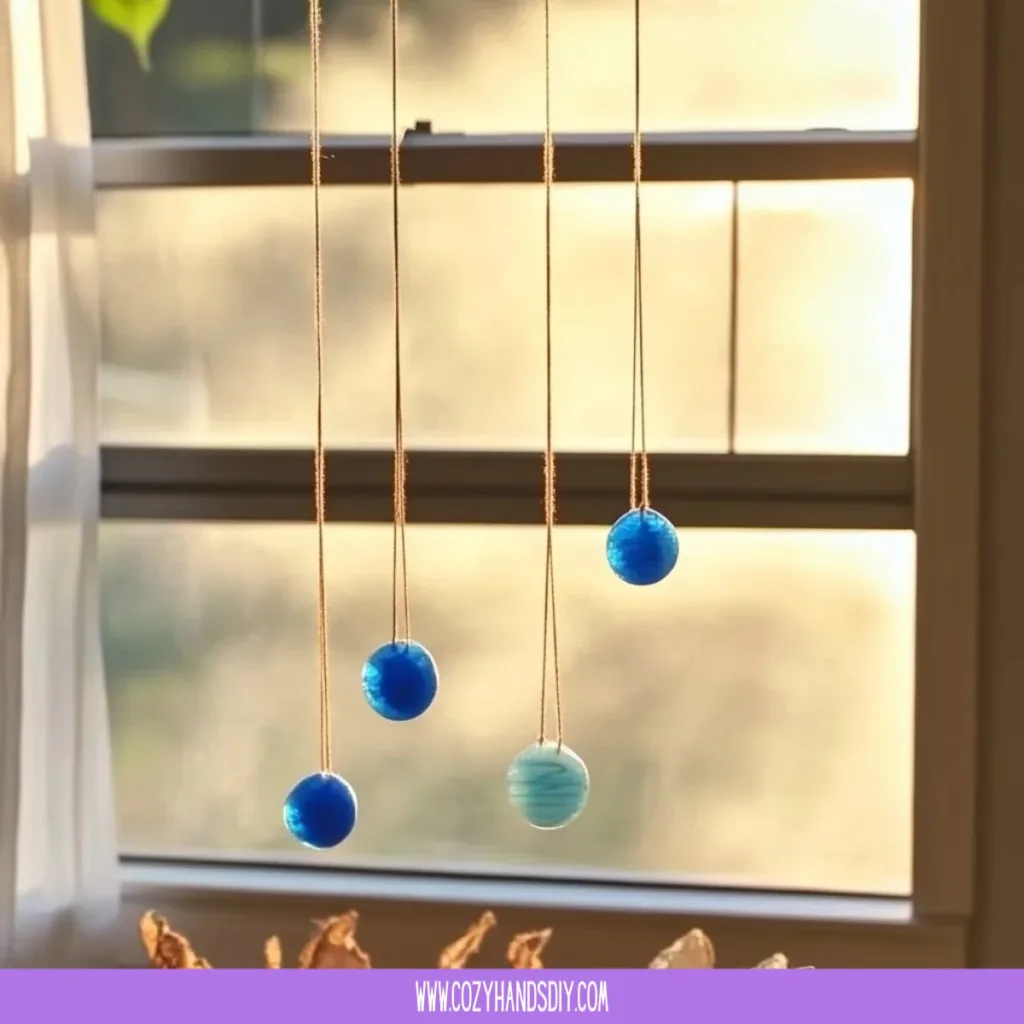
A finished Blue Crayon Suncatcher brings a gentle, shifting light into the room. Hang it in a window that receives soft, indirect light. Watch how tones move across the piece throughout the day. Morning light will make paler blues sing, while afternoon warmth will deepen richer shades. The movement matters. It makes the suncatcher feel alive.
You can group several suncatchers at different heights to create a small mobile of color. The resulting display offers a slow visual track across the day. Place one near a reading nook where its light can rest on your hands as you hold a book. I like to hang one above my tea station, where the blue glow adds a quiet, cooling counterpoint to steam and warmth.
If you make variations, consider layering small translucent papers or a touch of clear glue to add texture. These additions alter how light refracts and can make the suncatcher feel like a tiny, suspended landscape. Keep the display cozy and uncluttered so each piece gets room to breathe.
How to Store or Reuse Blue Crayon Suncatchers
Store finished suncatchers flat in a cool, dry place when you are not displaying them.
Avoid direct heat or leaving them in a sunny car, as excessive warmth can soften the wax.
If a piece warps slightly over time, a gentle reheat in a low oven can reshape it.
Leftover shavings keep well in small jars or paper envelopes.
Use them to top future projects or to create layered pieces with new colors.
If a suncatcher chips, you can remelt the fragments into a new shape, which helps the craft feel circular and sustainable.
I once stored a group of suncatchers in a shallow wooden drawer lined with tissue. Opening that drawer was like uncovering a small, cool sea of blues. The wax kept its vibrance and the pieces unbothered by dust. When you tuck them away, treat each piece as a small artifact of calm.
Gentle Tips & Variations
- Invite texture: Add tiny bits of translucent bead or thin tissue paper into the wax while it warms.
They soften the light in delicate ways and do not weigh the piece down. - Play with scale: Use small silicone candy molds for tiny suncatchers.
They make lovely window garlands and are quick to create when you want a short, soothing session. - Mix a hint of other colors: A whisper of silver or soft gray can make blues feel deeper.
Use sparingly to keep the mood calm and harmonious. - Recycle and reduce waste: Save tiny crayon ends in a glass jar.
They form a lovely, unpredictable palette when melted together. - Use scent carefully: If you like fragrant crafts, add a tiny drop of essential oil to left-over shavings stored in a jar, not to the wax while melting.
Direct heat can alter aroma and safety.
These suggestions come from slow experiments and small happy accidents. Approach them as invitations. Let the process guide you rather than strict rules. When a variation calls to you, try it in a small test piece first.
What I’ve Learned While Making This
I learned that patience improves both the process and the object.
Rushing the melt stage makes edges uneven and can dim the clarity of the color.
Soft, steady heat keeps wax smooth and the colors true.
I learned to trust my hands. A hesitant nudge often creates a more interesting pattern than a forceful swirl.
The suncatcher responds to small gestures more than to dramatic ones.
That idea carries into how I approach days too: small, steady actions gather light over time.
I also learned to look after safety. Low temperatures, good ventilation, and organized tools keep the experience peaceful.
When I make with children or friends, I set a calm rhythm and turn the work into shared quiet time rather than a hurried craft session.
FAQs About Blue Crayon Suncatchers:
u003cstrongu003eWill this melt make my house smell bad?u003c/strongu003e
u003cpu003eYou might notice a faint wax scent as crayons melt, but it is usually mild.u003cbru003eUse low heat and good ventilation and the scent will remain soft and unobtrusive.u003c/pu003e
u003cstrongu003eCan I use other colors or mixed crayons?u003c/strongu003e
u003cpu003eYes. Mixing colors creates warm, layered effects.u003cbru003eIf you mix many bright colors, expect a more opaque look; keeping the palette narrow keeps light passing through.u003c/pu003e
u003cstrongu003eAre these suncatchers fragile?u003c/strongu003e
u003cpu003eThey are delicate but not brittle.u003cbru003eHandle them gently and avoid prolonged exposure to direct, intense heat or sunlight which can soften the wax.u003c/pu003e
u003cstrongu003eCan I add glitter or metallics?u003c/strongu003e
u003cpu003eSmall amounts of fine glitter can add sparkle, but use it sparingly.u003cbru003eHeavier materials can sink or change how the wax sets.u003c/pu003e
u003cstrongu003eIs this safe for making with kids?u003c/strongu003e
u003cpu003eYes, with supervision. Children can grate crayons and place shavings.u003cbru003eHave an adult manage the oven stages and any tool that gets hot.u003c/pu003e
A Quiet Closing Thought
Sit with your finished Blue Crayon Suncatcher for a moment of calm. Notice how the light moves and how the color settles in your chest. Making something by hand gives a gentle permission to slow down, to be present, and to delight in small things. Keep the process simple and kind to yourself. Let each suncatcher mark a soft pause in the day.
Conclusion
If you want a different take on raindrop-shaped light, the Raindrop Sun Catchers video tutorial offers a thoughtful demonstration that complements these ideas. For additional technique and beginner-friendly steps, the Recycled Crayon Suncatchers guide from KiwiCo provides clear visuals and helpful tips.
Thank you for inviting a small ritual of making into your day. May the Blue Crayon Suncatchers you create shine softly and remind you how quiet, mindful hands can bring more light into a room.
PrintBlue Crayon Suncatchers

A calming craft project to create beautiful suncatchers using blue crayons that illuminate when hung in a window.
- Prep Time: 15 minutes
- Cook Time: 20 minutes
- Total Time: 35 minutes
- Yield: 3 suncatchers
- Category: Craft
- Method: Melting
- Cuisine: N/A
- Diet: N/A
Ingredients
- Blue crayons, assorted shades
- A vegetable peeler or crayon sharpener
- Parchment paper or silicone baking mat
- Heat-safe silicone molds or a firm spacer ring
- A cookie sheet or oven-safe tray
- Oven or small toaster oven set to low temperature
- Hole punch or small metal skewer for making a hanging hole
- Ribbon, string, or clear fishing line for hanging
- Small paintbrush or toothpick for easing edges
- A window with steady light for display
- A shallow bowl of cool water and a drying cloth
Instructions
- Preheat your oven to a low temperature, around 250 degrees Fahrenheit.
- Place the tray with molding area in a calm, well-ventilated spot.
- Gather your crayon pieces and tools so you do not rush.
- Remove paper wrappers from crayons and sort shades of blue.
- Use a peeler to shave gentle curls or small shards of wax.
- Arrange a single layer of shavings in the silicone mold.
- Mix light and dark blues with a soft eye toward balance.
- Cover the mold with a sheet of parchment paper for protection.
- Slide the mold onto the tray and place it in the oven.
- Watch for the wax to soften and gleam, not bubble.
- Remove the tray carefully when the wax has melted into a smooth pool.
- If you want a marbled look, tilt the tray slightly.
- Allow the wax to cool partially, so it firms but stays pliable.
- Once cool and firm, flex the silicone mold to release the suncatcher.
- Thread ribbon or fishing line through the hole and tie a neat knot.
- Clean up your space with the bowl of cool water and a cloth.
Notes
These suncatchers can be hung in a window to catch indirect light. Experiment with different shades and layering techniques for unique designs.