

The sunlight shines softly as it dances through the leaves, casting warm patterns on the table. You gather an assortment of green crayons, each one unique with its rich texture and color. As you lovingly unwrap the wrappers and feel the smoothness of the crayons in your hands, a sense of calm washes over you. The thought of melting these crayons into gentle raindrop shapes brings a warm, inviting comfort. This simple act of creation, making DIY Green Crayon Raindrop Suncatchers, becomes a soothing moment, one where you can breathe deeply and embrace the joy of crafting something beautiful that catches the light and brings warmth to your space.
The Quiet Joy of Making DIY Green Crayon Raindrop Suncatchers

Creating DIY Green Crayon Raindrop Suncatchers allows for a delightful escape from the rush of everyday life. This project draws you in, letting you focus your mind and hands on something tangible and gentle. The act of melting crayons transforms an ordinary moment into one filled with warmth and creativity. The rich, vibrant colors blend together, bringing joy not only to the process of making but also to the finished creation that sparkles in the sunlight.
Crafting these suncatchers encourages a slow pace. As you work with your materials, you experience sensory moments that soothe and ground you. The melting wax creates a sweet, subtle scent that wafts in the air, reminding you of childhood moments spent in art. Watching the crayons drip and meld leaves a satisfying imprint on your mind, blending the calming process of making with the anticipation of each reveal. This DIY becomes a mindful practice, allowing you to embrace each step without haste.
The Flow of Making DIY Green Crayon Raindrop Suncatchers
To fully enjoy this peaceful experience, consider each movement you make while creating the suncatchers. Picture yourself opening the crayon wrappers as the sound of their silky paper gives way to the smoothness of the crayons. Feel the gentle heat of your melting pot, knowing that soon, you will pour the melted colors into beautifully shaped molds. As you wait for the crayons to meld, take a moment to focus on the warmth of your surroundings and the colors weaving together to create something new.
Gathering Your Materials
Before you embark on your crafting journey, take a moment to gather the materials that will bring your DIY Green Crayon Raindrop Suncatchers to life. Here’s a gentle list to help guide your gathering:
- Green crayons (easy to find in craft stores)
- Silicone molds (any shape you find comforting)
- A melting pot (or microwave-safe container)
- Parchment paper (to catch any spills)
- A baking sheet (for easy transportation)
- An oven (set at a low temperature, if needed)
These items come together harmoniously, inviting you to begin your crafting experience without any stress. If you want to make raindrops in a different color, feel free to expand your crayon collection. Just ensure they are non-toxic and safe for creating.
Step-by-Step Directions

- Start by preheating your oven to a low temperature, around 200°F (93°C). This gentle heat will melt the crayons slowly, keeping the colors rich and vibrant.
- Unwrap the green crayons and break them into small pieces. The sound of breaking crayons is oddly satisfying, a brief moment of transformation before the real magic starts.
- Place the crayon pieces into your silicone molds. Feel free to experiment with various shapes, or stick to simple raindrops. Let your heart guide your choices.
- Once your molds are filled, carefully place them on the baking sheet. This will make it easy to move them in and out of the oven without spills.
- Place the baking sheet in the preheated oven. Watch patiently as the crayons melt, taking care to avoid opening the oven door too often. The hypnotic sight of the colors blending brings a sense of tranquility.
- After about 10-15 minutes, check the crayons. They should be completely melted. The colors will have turned into a beautiful swirl, inviting you to savor the moment.
- Once melted, carefully remove the baking sheet from the oven. Allow the molds to cool slightly once you have transferred them to a safe spot.
- When cool enough to touch, gently remove the suncatchers from the molds. Experience the smooth, warm shapes in your hands, celebrating the unique appearance of each one.
Using DIY Green Crayon Raindrop Suncatchers in Everyday Life

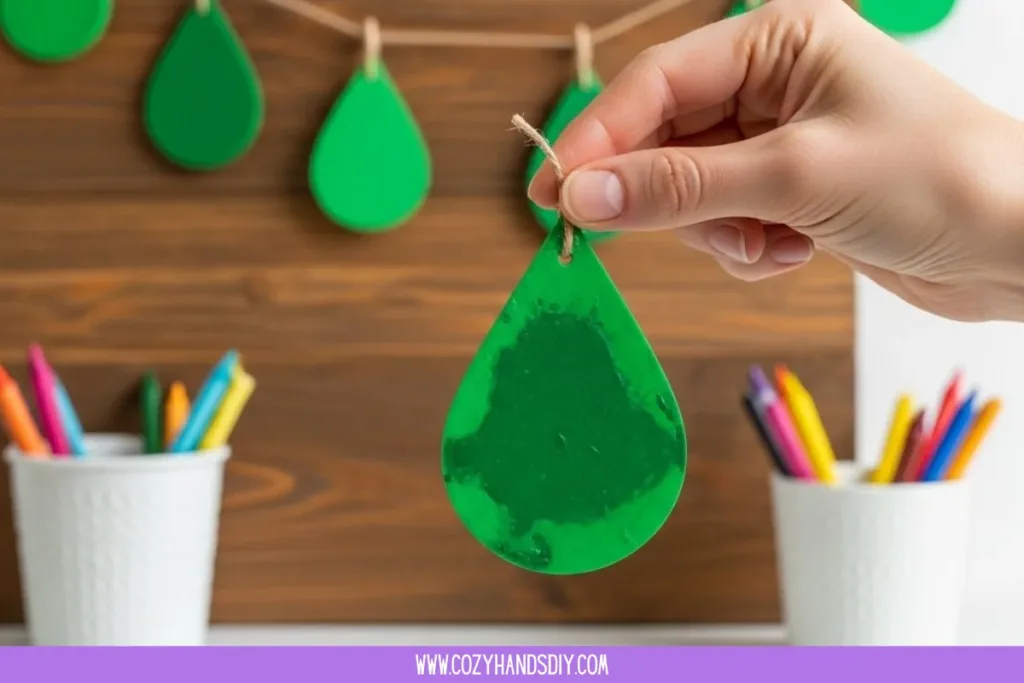
Displaying your finished DIY Green Crayon Raindrop Suncatchers can brighten your space in the most delightful way. Hang them in a sunny window where they can catch the light, casting colorful reflections around your room. Each time the sunlight touches the suncatchers, they will transform your space into a magical environment filled with warmth.
You may also place them on a windowsill or attach them to a string to create a light-catching mobile. If you’re feeling extra creative, consider pairing them with other DIY pieces to make a unique gallery of your handmade treasures.
Bringing these suncatchers into your home creates a gentle reminder of the time spent crafting. Each glance at their colors can evoke memories of peaceful moments during their creation.
How to Store or Reuse DIY Green Crayon Raindrop Suncatchers
Storing your DIY Green Crayon Raindrop Suncatchers is simple. When the seasons change or if you want to switch up your decor, you can gently wrap them in soft cloths or place them in a small box. Ensure they are protected from direct sunlight, as prolonged exposure may cause them to fade over time.
If you want to repurpose your suncatchers, consider re-melting them into new shapes when the desire strikes. You can break them down and melt them again, trying new color combinations. This shared experience makes them not just a single project but a source of ongoing creativity.
Gentle Tips & Variations
As you create your DIY Green Crayon Raindrop Suncatchers, here are a few gentle invitations to explore personal touches:
- Consider mixing in other colors like blue or yellow to create gradients in your raindrops. This adds an extra layer of personality and expression.
- Try adding clear or translucent crayons for a more muted, soft pastel effect. The gentle shades can create a calming visual.
- Use different molds for various shapes hearts, stars, or clouds add whimsy and magic to your home.
- Experiment with layering colors in the molds. Pour one color, allow it to set just a little, then add another. This creates lovely sections in the suncatchers.
- Explore adding natural materials or glitter for embellishments. Just remember to keep it subtle to maintain the gentle experience.
Explore More Mindfulness Crafts
If you enjoyed this calming project, you’ll love our full collection of mindfulness crafts. These hands-on DIY recipes are designed to slow things down, encourage focus, and turn simple materials into peaceful, creative moments you can enjoy anytime.
FAQs
What if my crayons don’t melt completely?
Sometimes crayons can clump together. If you notice this, stir the melted colors gently with a toothpick or skewer. Just practice patience and enjoy the process of discovery.
Can I use crayons other than green?
Absolutely! Feel free to explore any color combination that speaks to you. Each shade can reflect different emotions and experiences.
How can I clean my silicone molds?
Cleaning silicone molds is simple. Gently wash them with warm, soapy water, ensuring no residue remains. They are durable and can be reused for various projects.
Is this DIY safe for children?
While melting crayons can be done with children, supervision is key. Keep hot surfaces away from little hands, and enjoy the process together as a safe bonding activity.
Can I use a microwave instead of an oven?
Yes, a microwave can work well too. Just be mindful of timing. Heat in short intervals, stirring gently until melted. Monitor closely to avoid any hot spots.
A Gentle Note Before You Go
As you reflect on your journey of making DIY Green Crayon Raindrop Suncatchers, remember the joy found in the moments of creation. Each step brought you closer to not just a finished piece but a meditative experience.
Encourage yourself to enjoy the textures, colors, and the process of crafting. Allow the experience to wash over you gently, leaving behind a trace of calm in your day. The suncatchers remain a testament to your creativity, a reminder that even in the simplest acts of making, there is a profound joy to be found.
Find Daily Cozy DIY Inspiration on Pinterest
For even more gentle DIY ideas, creative inspiration, and cozy hands-on projects, follow Cozy Hands DIY on Pinterest. We share new crafts daily, save-worthy visuals, and calming recipes you can come back to whenever you need a little creative peace.
DIY Green Crayon Raindrop Suncatchers

Craft beautiful green crayon raindrop suncatchers to brighten your space and bring warmth from the sunlight.
- Prep Time: 15 minutes
- Cook Time: 15 minutes
- Total Time: 30 minutes
- Yield: 4 suncatchers
- Category: Crafts
- Method: Melting
- Diet: N/A
Ingredients
- Green crayons (easy to find in craft stores)
- Silicone molds (any shape you find comforting)
- A melting pot (or microwave-safe container)
- Parchment paper (to catch any spills)
- A baking sheet (for easy transportation)
- An oven (set at a low temperature, if needed)
Instructions
- Preheat your oven to a low temperature, around 200°F (93°C).
- Unwrap the green crayons and break them into small pieces.
- Place the crayon pieces into your silicone molds.
- Carefully place the molds on the baking sheet.
- Put the baking sheet in the preheated oven until the crayons are completely melted (about 10-15 minutes).
- Remove the baking sheet from the oven and allow the molds to cool slightly.
- When cool enough, gently remove the suncatchers from the molds.
Notes
Store your suncatchers wrapped in soft cloths or in a small box to protect them from sunlight.