

Creating a space filled with soft, dancing light brings a sense of peace and comfort. As you sit down to craft DIY Bioplastic Suncatchers, you can feel the gentle warmth of the sun filtering through an open window. The light interacts with the colors you’ll use, creating an intimate dance of shadows and brilliance all around your room. This simple task of making art can connect you deeper to the present moment, allowing you to breathe and focus on creating something unique and lovely for your space.
The Heart Behind This DIY

The act of creating something with your hands anchors you in the here and now. This is especially true when working with materials like bioplastics, which have a softer impact on our environment. As you delve into making DIY Bioplastic Suncatchers, you engage all your senses. You’ll feel the smoothness of the bioplastics, hear the subtle sound of your tools working together, and see the transformation unfold. This mindful attention calms the mind and invites you to slow down.
As you mold and color your suncatcher, you’ll find comfort in repetition and the gradual unfolding of your creation. Each step feels significant, allowing you to connect deeply with both the materials and your own creative instincts. You can express your unique style through color and shape, which cultivates a sense of personal ownership and fulfillment.
A Gentle Look at the Process

Before diving into the project, let’s take a moment to explore how this DIY comes together. The flow of creation is as much about the tactile experience as it is about the end product. You will start with a gentle approach, preparing your materials and workspace. Each sound, akin to a soft breeze, softly beckons you to focus on the rhythm of your actions.
As you mix and shape the bioplastic, notice how it feels in your hands. The texture is smooth and supple, allowing for exploration. It is a sensory-rich experience that invokes a soothing atmosphere, making the process feel inviting. Watching the colors blend and flow brings delight, bringing a little joy into your space.
Materials You’ll Need
Gathering your materials ahead of time sets a calming tone for your creative journey. You can find these items easily at craft stores, or you may have some on hand.
- Bioplastic pellets (natural origin, easy to mold)
- Food coloring (your choice of colors, optional)
- A small pot for melting
- A wooden stick or spoon (for stirring)
- A non-stick surface or wax paper (for drying)
- Scissors (for cutting shapes)
- String or fishing line (for hanging)
- Hole punch (optional)
As you gather your materials, take a moment to enjoy the textures and colors. When you breathe in this process, you invite a sense of purpose and calm.
Step-by-Step Directions
- Begin by melting the bioplastic pellets on low heat in your small pot. Stir gently until they dissolve into a smooth, thick liquid. Feel the warmth radiating from the pot; let it soothe your hands.
- Once fully melted, remove the pot from heat. This is where you can add your chosen food coloring. Stir slowly, watching the colors merge and come alive.
- Pour the colored bioplastic onto your non-stick surface or wax paper. You can spread it into shapes that resonate with you.
- As it cools, use scissors to cut your suncatcher into delightful forms. Allow the rhythm of cutting to flow; it can be a meditative action.
- To finish, use a hole punch to create a small hole at the top of your suncatcher. This will allow space for string or fishing line.
- Let your creation dry completely, embracing the anticipation of the finished piece.
- Once dry, thread the string through the hole. You can hang it in a sunny spot where it will shine beautifully throughout the day.
Feel the joy of completion wash over you as you hang your suncatcher. Each creation is a unique reflection of your intentions and creativity.
Bringing DIY Bioplastic Suncatchers Into Your Space

Placing your finished suncatcher in a sunny window transforms your space. As the light filters through, it paints beautiful colors across your walls and floor. You can choose a spot where you spend time, perhaps over your reading nook or in a calm corner of your living room.
Each time light dances through your suncatcher, it creates a calming, ever-changing atmosphere. It serves as a gentle reminder of your creative journey, inviting you to pause and appreciate the beauty of the moment. You can even create a few different shapes, hanging them at varying heights to create a lovely mobile effect. This brings a sense of whimsy and delight to your surroundings.
How to Store or Reuse DIY Bioplastic Suncatchers
If you decide to take your suncatcher down or make seasonal changes to your decor, caring for these pieces is straightforward. Store them in a cool, dry place away from direct sunlight to retain their vibrancy. If they get a little dusty, a gentle wipe with a soft cloth can restore their luster.
Should you wish to repurpose your suncatchers in the future, consider ways to embellish them further with new colors or attached elements. This keeps them fresh and relevant while maintaining the essence of your past creative endeavors.
Gentle Tips & Variations
Creating is both personal and unique. Here are gentle suggestions to inspire you on your crafting journey:
- Experiment with layered colors. Instead of mixing all colors at once, pour one layer, let it cool slightly, then add another color for depth.
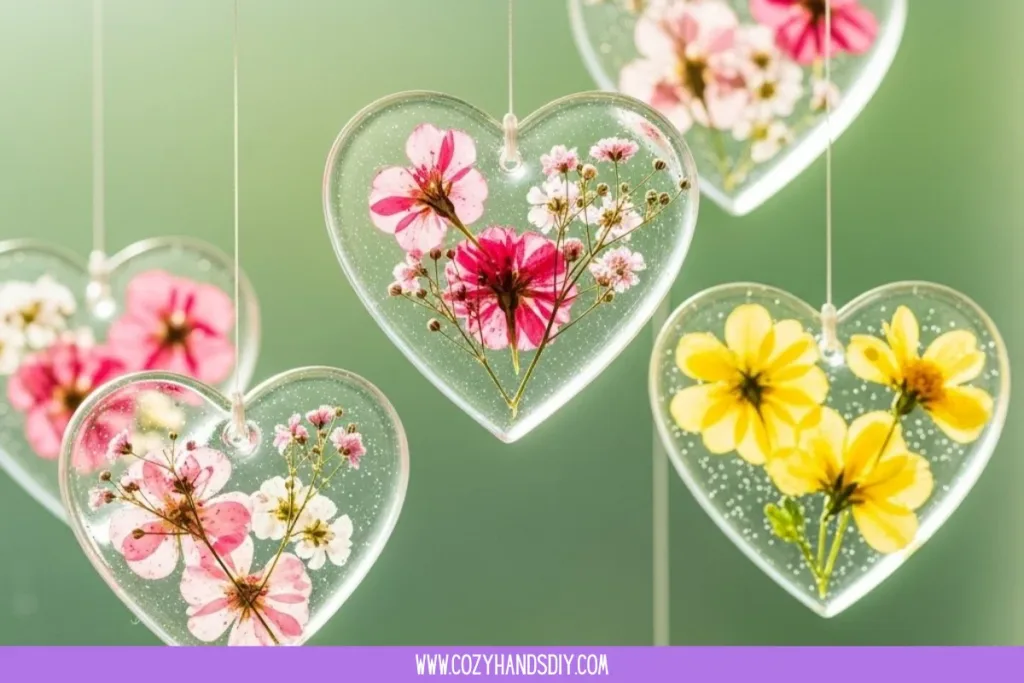
- Use natural elements like leaves or flowers pressed into the bioplastic before it hardens. This creates beautiful designs that connect you further to nature.
- Keep your workspace cozy with soft music or light scents. This enhances the sensory experience of your project.
- Share the experience with loved ones. Making together can foster connection and growth.
These ideas invite you to explore your creativity and personalize your suncatchers in a way that feels right for you.
Explore More Mindfulness Crafts
If you enjoyed this calming project, you’ll love our full collection of mindfulness crafts. These hands-on DIY recipes are designed to slow things down, encourage focus, and turn simple materials into peaceful, creative moments you can enjoy anytime.
FAQs
What should I do if my bioplastic doesn’t melt properly?
Sometimes heat can be tricky. Make sure to use low heat and stir consistently. If it isn’t melting, allow it a little more time on the heat, checking frequently.
Are there any specific colors that work best for suncatchers?
You can choose vibrant colors or pastels based on your preference. Consider how they will complement your space and mood.
How long will the suncatchers last?
With proper care, your suncatchers can last for months. Just keep them out of extreme heat or direct sunlight for long periods to maintain their quality.
Can I store my leftover bioplastic?
If you have leftover pellets, store them in a dry place. They can be reused for future projects, making crafts both sustainable and fun.
What do I do if I want to change my suncatcher design?
Feel free to take them down and start a new project anytime! Crafting is all about playfulness and evolution, so embrace the opportunities.
DIY Bioplastic Suncatchers

Craft beautiful and environmentally friendly bioplastic suncatchers to brighten your space with color and light.
- Prep Time: 15 minutes
- Cook Time: 10 minutes
- Total Time: 25 minutes
- Yield: 2-3 suncatchers
- Category: Craft
- Method: Crafting
- Cuisine: N/A
- Diet: N/A
Ingredients
- Bioplastic pellets (natural origin, easy to mold)
- Food coloring (optional)
- A small pot for melting
- A wooden stick or spoon (for stirring)
- A non-stick surface or wax paper (for drying)
- Scissors (for cutting shapes)
- String or fishing line (for hanging)
- Hole punch (optional)
Instructions
- Melt the bioplastic pellets on low heat in a small pot, stirring until they dissolve into a smooth liquid.
- Remove from heat and add food coloring of your choice, stirring slowly.
- Pour the colored bioplastic onto a non-stick surface or wax paper, spreading it into desired shapes.
- As it cools, use scissors to cut the suncatcher into shapes you like.
- Use a hole punch to create a small hole at the top for string or fishing line.
- Let the suncatcher dry completely.
- Thread the string through the hole and hang your suncatcher in a sunny spot.
Notes
Store suncatchers in a cool, dry place away from direct sunlight. They can last for months with proper care.
A Gentle Note Before You Go
Creating DIY Bioplastic Suncatchers offers a unique blend of tactile experience and mindful intention. As you hang your handmade piece, take a moment to reflect on the act of creation and its importance in your life. Every moment spent in this creative flow helps you connect with the present, fostering a sense of calm and contentment.
Allow the colors to bring joy into your space and the act of making to remind you of your own creativity. Embrace these moments of stillness amidst your busy days, and let them inspire you to create more.
Find Daily Cozy DIY Inspiration on Pinterest
For even more gentle DIY ideas, creative inspiration, and cozy hands-on projects, follow Cozy Hands DIY on Pinterest. We share new crafts daily, save-worthy visuals, and calming recipes you can come back to whenever you need a little creative peace.