

The morning light spills into the room, casting delicate shadows as it dances across surfaces. You sit at a cozy table, surrounded by soft textures and familiar scents. A gentle warmth fills the air, inviting you to create something beautiful. This moment is perfect for making DIY Bioplastic Suncatchers, where your hands can connect with the materials and your heart can find peace in the process. As you focus on the playful colors and forms, worry begins to fade, replaced by a sense of calm and purpose. The experience of crafting suncatchers becomes a meditative journey, where each step blossoms with possibility.
The Heart Behind This DIY

Creating DIY Bioplastic Suncatchers offers a chance to slow down and embrace the present. This process is not merely about crafting something to hang in a window; it’s about the enjoyment of creating, feeling, and connecting with the materials. The gentle repetition of movements invites a mindful rhythm, which can have a soothing effect on your mind and body.
As you melt the bioplastic and shape it, you engage your senses. The warmth of the material feels soft in your hands, and the colors mingle delightfully. This sensory connection grounds you, providing a welcomed escape from the noise of the day. Each suncatcher becomes a small piece of art infused with your unique touch, allowing you to express your creativity in a comforting way.
Furthermore, hanging your finished suncatchers allows the sunlight to filter through, casting vibrant colors onto walls and floors. This spectacle creates an ambiance that enchants your space, reminding you of the beauty found in simple, intentional actions. Through this process, you honor not just the end result but the meaningful experience of making something lovely by hand.
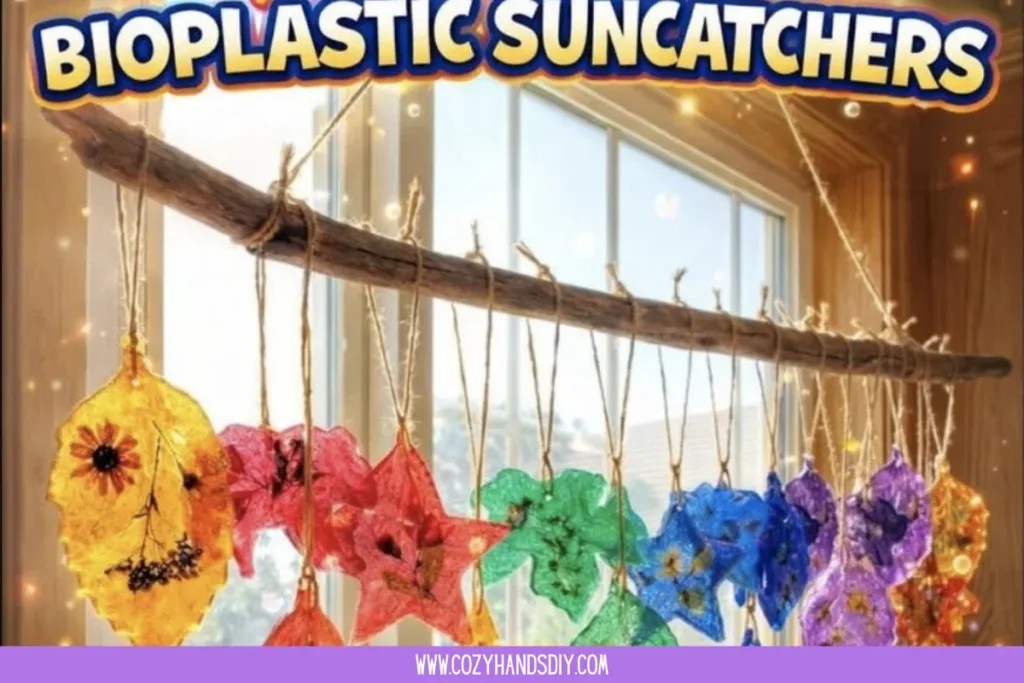
A Gentle Look at the Process
{image_3}
Before diving into the making, let’s take a gentle moment to breathe and envision the process. Imagine the sound of boiling water bubbles gently clinking together as you prepare to melt the bioplastic. Picture the smooth texture as you pour it into molds, and the anticipation as each piece cools, forming into something wonderful.
The feeling of transforming materials is both magical and simple. You’ll experience a connection to the earth and your own creativity, as you shape these pieces into colorful suncatchers. There’s a grace in the flow: gathering your materials, preparing your workspace, and letting your imagination guide you as you create. It unfolds softly, inviting you to pause and savor each moment.
Materials You’ll Need
{image_4}
- Bioplastic pellets (easy to find at craft stores)
- Water
- A small pot for melting
- Silicone molds or cookie cutters
- Food coloring (optional)
- A stirring stick or spoon (wooden or silicone)
- A heat-resistant surface (for cooling)
- String or fishing line (for hanging)
Gathering these materials can be part of your calming ritual. You might find joy in picking out colors or shapes that resonate with you. The process of collecting and preparing connects you to the journey ahead.
Step-by-Step Directions

- Start by setting up your workspace. Lay out your materials and ensure you have everything you need at hand. Feel the textured surface under your fingers, and take a moment to breathe deeply.
- In a small pot, measure out the bioplastic pellets. As you pour them in, notice their smoothness and how they feel in your hand.
- Add just enough water to cover the pellets. Let this mix rest for a moment before placing the pot on the stove.
- Gently heat the pot over low to medium heat. Stir occasionally with your stick. Listen to the soft sounds of the melting plastic, almost like a quiet whisper.
- Once the pellets have fully melted and transform into a clear liquid, you can add a few drops of food coloring if desired. Stir slowly, allowing the color to blend seamlessly.
- When the mixture is ready, carefully pour it into the silicone molds or onto the cookie cutters. Take your time, appreciating the way the liquid flows and takes shape.
- Let the suncatchers cool completely. This might take a bit of time, so enjoy the sight of your creations taking form as your mind relaxes.
- Once cooled and firm, gently pop the suncatchers out of their molds. Feel the smooth surface against your fingertips and admire your handiwork.
- Finally, attach a string to each suncatcher for hanging. Imagine how they will sway gently in the breeze, catching the light as they bring color into your space.
Enjoying the Finished Piece

Now that your DIY Bioplastic Suncatchers are ready, it’s time to celebrate their beauty in your home. Hang them by a window where the light can playfully interact with the colors. Watch as the sunlight filters through, casting lovely patterns onto your walls and floor. There’s something deeply satisfying about creating a space filled with warmth and light.
Consider incorporating this project into your calm routine. Invite a friend over for a cozy afternoon of crafting, or make it a solo endeavor when you need a mindful break. The suncatchers can also make thoughtful gifts. Imagine the joy they can bring someone as they catch the light on a sunny day, serving as a reminder of your friendship and care.
How to Store or Reuse DIY Bioplastic Suncatchers
Your suncatchers deserve to last and shine bright as a comforting presence in your space. When storing them, find a safe spot away from direct sunlight to prevent fading. Placing them in a soft pouch or between layers of fabric can help prevent scratches or damage.
If you ever change your mind about their colors or shapes, don’t worry. You can repurpose the bioplastic by remelting it. Simply reheat gently, and pour it into new molds to create entirely fresh pieces. This way, your crafting journey remains open and evolving, just like your creativity.
Small Ways to Make It Your Own
Crafting is a personal expression, and adding your unique touch can help your suncatchers feel even cozier. Here are a few gentle invitations to explore:
- Experiment with layering colors. Pour one color, allow it to set for a few minutes, then add another layer on top for beautiful depth.
- Use textured molds or even leave impressions in the wet bioplastic. This adds a tactile dimension that enhances the sensory experience.
- Consider integrating natural elements. You might press in dried flowers or leaves before the bioplastic sets, which can beautifully connect your suncatchers to nature.
- Explore varying sizes and shapes. Tiny mini suncatchers can add charm when grouped together, while larger ones can make a bold statement.
Create Warm Home Decor by Hand
If you love adding handmade touches to your space, explore our warm home decor projects. These DIY recipes focus on cozy textures, soft details, and simple ways to make your home feel inviting.
FAQs
What are bioplastic suncatchers made of?
Bioplastic suncatchers are made from renewable bioplastic pellets that melt and take shape. These materials are eco-friendly and offer a vibrant way to create art.
Can I use regular plastic for suncatchers?
It’s best to use bioplastics for this project. They offer a more sustainable option and provide a softer, user-friendly experience when crafting.
How do I clean the finished suncatchers?
Cleaning is simple. Just wipe them gently with a damp cloth. Avoid harsh chemicals that could scratch or dull the surface.
How long do they last?
With proper care, bioplastic suncatchers can last a long time. However, avoid prolonged exposure to direct sunlight to prevent fading.
Can I make these with kids?
Absolutely! This project is a wonderful way to engage children in creative making. Just be sure to supervise during the melting process to keep it safe.
DIY Bioplastic Suncatchers

A calming and creative project to make colorful bioplastic suncatchers for your space.
- Prep Time: 10 minutes
- Cook Time: 15 minutes
- Total Time: 25 minutes
- Yield: Multiple suncatchers
- Category: Craft
- Method: Crafting
- Cuisine: N/A
- Diet: N/A
Ingredients
- Bioplastic pellets
- Water
- A small pot for melting
- Silicone molds or cookie cutters
- Food coloring (optional)
- A stirring stick or spoon (wooden or silicone)
- A heat-resistant surface (for cooling)
- String or fishing line (for hanging)
Instructions
- Set up your workspace, laying out your materials.
- Measure out the bioplastic pellets into the pot.
- Add enough water to cover the pellets and let it rest.
- Heat the pot over low to medium heat, stirring occasionally.
- Once melted, add food coloring if desired.
- Carefully pour the mixture into molds or cookie cutters.
- Allow the suncatchers to cool completely.
- Gently pop them out of the molds and admire your handiwork.
- Attach a string for hanging.
Notes
Store suncatchers away from direct sunlight to prevent fading. They can be repurposed by remelting if desired.
A Gentle Note Before You Go
Creating DIY Bioplastic Suncatchers is more than just a project; it’s an exploration of texture, color, and mindfulness. As you reflect on your experience, take a moment to appreciate the quiet joy it brings. Each piece is not only a colorful addition to your home but also a reminder of the delightful journey you took with your hands and heart.
Savor the beauty of the moment and the creative energy you’ve stirred. Allow the light to spill through your suncatchers, filling your space with warmth and inspiration. Embrace this calmness in every project you pursue, and let your imagination guide you gently into new crafting adventures.
Find Daily Cozy DIY Inspiration on Pinterest
For even more gentle DIY ideas, creative inspiration, and cozy hands-on projects, follow Cozy Hands DIY on Pinterest. We share new crafts daily, save-worthy visuals, and calming recipes you can come back to whenever you need a little creative peace.